I can’t tell you how long I’ve wanted to make a glass-on-glass mosaic. But I always put it off because I couldn’t find the right glass tiles. They were either too small, too thin, or too opaque. And then this happened.
 I dropped a brand-new tempered glass shelf, which shattered into a gazillion little pieces. But unlike regular glass, there aren’t any jagged shards, just an endless sea of blunt-edged crystals scattered everywhere.

And they’re perfect for making a no-frills glass-on-glass mosaic.

Don’t you just love the look?

I used a large glass vase as the base for my mosaic.

If you don’t want to tackle a big project like this one, you can use tempered glass to make this adorable mosaic doorstop. But then you wouldn’t get this effect if you pop some lights inside.

In this post, I’ll share my favorite tips and tricks for making a tempered GOG (glass-on-glass) mosaic.

Hopefully, it will make your life easier when you give it a go. But, before we get there, follow us on Facebook, Twitter, Pinterest, or Instagram. And don’t forget to subscribe so you’ll never miss a post!
What you need
- A suitable glass vessel
- E6000 glue or GE Clear Silicone 2 or another glass-compatible adhesive.
- Grout
- Sponge
- Gloves
- Shattered tempered glass
Where can I find shattered tempered glass?
Don’t go dropping any shelves. It’s messy and expensive. You should be able to find broken or cracked tempered glass at auto repair shops. I’ve also seen bags of broken tempered safety glass pieces on Amazon.

I would suggest separating the pieces into zip-lock bags by size and edge type. It makes it so much easier to find the right piece when you start glueing the glass down.

Keep the straight pieces in a separate bag. They come in very handy for creating a neat edge to the final piece.
Making a tempered glass-on-glass mosaic
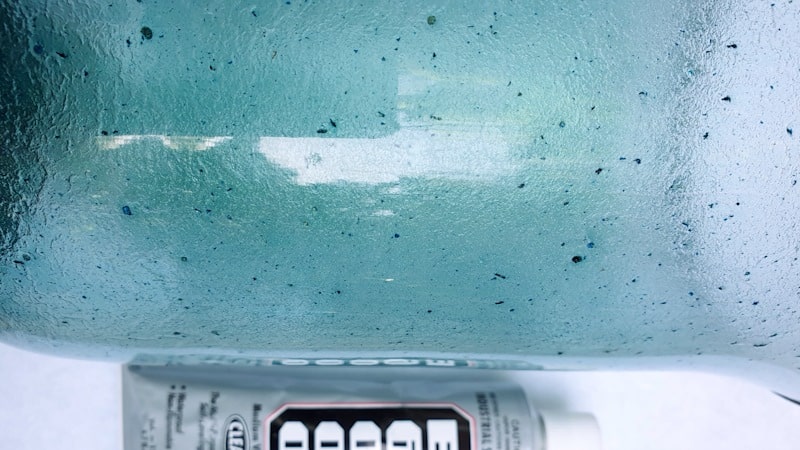
The process of making a tempered glass-on-glass mosaic is very similar to any other mosaic, with one key difference. Glass-on-glass (GOG) mosaics use clear adhesive to stick shards of transparent or colored translucent glass to a glass or plastic base. When the shards are applied in a pattern, you end up with a stunning, luminous piece that resembles a stained-glass window. Since I used shattered tempered glass on my vase, the effect is more random but equally gorgeous.

I also didn’t have to worry about cutting the glass into a predefined shape to fit into a design, which makes it ideal for a beginner. I do have a few tips to share that will make the whole process easier.
Tempered glass-on-glass mosaic tips
Keep it clean
There’s nothing worse than putting in all the effort to make a GOG mosaic only to find a stray hair or some unidentified object trapped under the glass. Make sure the glass base and the pieces are clean before glueing them down. I used methylated spirits to wipe my vase down first. Isopropyl Alcohol works too. They both dry quickly and leave no residue.
Use the right glue
PVA glue is not going to work, so put your Elmer’s and Weldbond away. You need a clear glue that’s strong and durable. I used E6000, but GE Clear Silicone or UV-curable adhesives will work too.
E6000 takes about 2 minutes to become tacky enough to hold the glass in place and starts setting in 10 minutes. It can take up to 36 hours to cure fully depending on the weather. Work in a well-ventilated area, because that stuff is smelly.

If you want to speed things up, you can use clear UV adhesives that cure quickly under UV light.
Applying the glue
Apply E6000 (or other clear, strong adhesive) directly to the surfaces you want to bond. I used a wooden stirrer to spread the glue onto the vase and move it into tight spots. It helps keep your hands glue-free too, unless you pick the stirrer up on the wrong end. I can’t tell you how many times I did that.
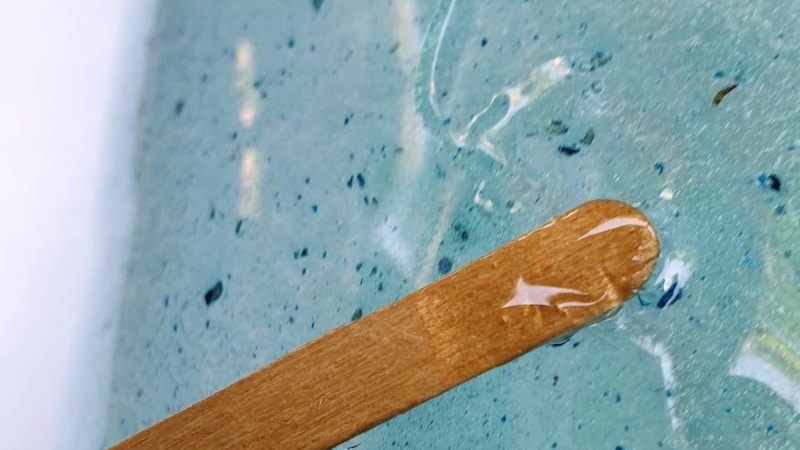
Work in sections, and don’t add too much glue in one go to avoid the glue drying before you can find the right bits of shattered glass. If you do add too much, clean the excess dry glue off with nail polish remover (acetone) before reapplying the glue.
It’s a sticky business
Making a tempered glass-on-glass mosaic is a sticky business. I always end up with tacky, gluey fingers, and it’s a mess. My best advice: keep some wet wipes handy for a quick cleanup. A friend of mine dusts her hands with cornstarch or cornflour. I’ve never tried it, but apparently it reduces the tackiness.

Take your time
I’ve been making mosaics for years, and it normally takes a day to finish something like this mixed-media unicorn. The glass-on-glass mosaic took about five days, not because it’s complicated. It’s not. You need to make sure the glue is completely dry before moving on to the next section. And because the vase is curved, gravity did not work in my favour. The tempered glass kept on sliding around.

With something like this, it’s okay to take your time and just enjoy the process. Dig around in those Ziploc bags until you find the right piece. Take a big sip of coffee, or whatever beverage works for you, and just admire what you’ve done. Before you know it, you’ll be hunting for that last sliver of shattered glass to glue in place.

Eeek, I have air pockets
Air pockets and bubbles are going to happen. Especially if you’re working on a curved surface. The good thing is they won’t be that visible if you use shattered glass. There’s so much else going on you’ll hardly notice them.

If you’re using glass tiles on a flat surface, the best way to get rid of bubbles is to apply the glue on both the tile and the glass base and press down firmly. Not too hard; you don’t want to crack the tile or the base. Wiggle or smoosh the tile around a little to work the air pockets out before moving the tile in place.
Finishing off the edges
There are two ways to get a neat edge: use grout or dig into that Ziploc bag of straight pieces. I used a combo of both. The bottom of the vase has been finished off with straight shards….

And the top is grout.

To grout or not to grout
I can’t believe I had to ask myself this question. One of my favourite things about a mosaic is grouting the piece once all the tiles are stuck down. The tempered glass vase just looked soooooo pretty in her raw, ungrouted state.

If I didn’t have to neaten up the top edge of the vase, I probably would have left it as is. Grouting a GOG mosaic is the same as any other mosaic. Mix the grout according to the instructions on the package and apply with a rubber float or your fingers.

I know, I know, grouting with your fingers is not a good idea, but I destroyed my fingerprints a long time ago making mosaics. Wipe any excess grout away with a damp sponge or old t-shirt.

Use a lint-free cloth to dry and polish the glass after grouting to avoid leaving streaks or fibres.

And that’s it. Pop a few fairy lights inside if that’s the way you roll…..

… and enjoy the display.

I’m so happy with how it turned out and grateful that I could repurpose a messy oopsie into a gorgeous centrepiece for our home.

If you like the idea of making a glass-on-glass mosaic, don’t forget to pin the tutorial for later.

Sharing is caring.

Oh, and if you’re looking for some of the things we used, we’ve got you covered. Disclosure: Clicking on the links below means we may receive a commission from Amazon. But don’t worry, it won’t come out of your pocket, and it helps us make more amazing crafts to share with you ;-)


And if you prefer to buy rather than DIY, perhaps these beauties will appeal.


And as always, wishing you a wonderful, crafty week filled with laughter and love. Thank you for popping in for a visit.

6 comments
Always brilliant ideas and upcycles, but this is next level AMAZING!
Don’t forget to join us over at the Creatively Crafty Linky Party every Wednesday through Sunday
https://creativelybeth.com/creative-crafts-linky-party-2/
Pinned!
Creatively, Beth
Thank you, Beth. I was so cross with myself when I dropped that shelf, so I’m glad it didn’t go in the trash.
Don’t you love happy accidents!? It looks amazing Mix!
Thanks so much, Sara. It seemed such a waste not to use all those broken bits
Only you could make something so pretty out of that smashed shelf. It looks stunning.
Thanks, Anita. Who knew a shattered shelf could have a second career as a showstopper?