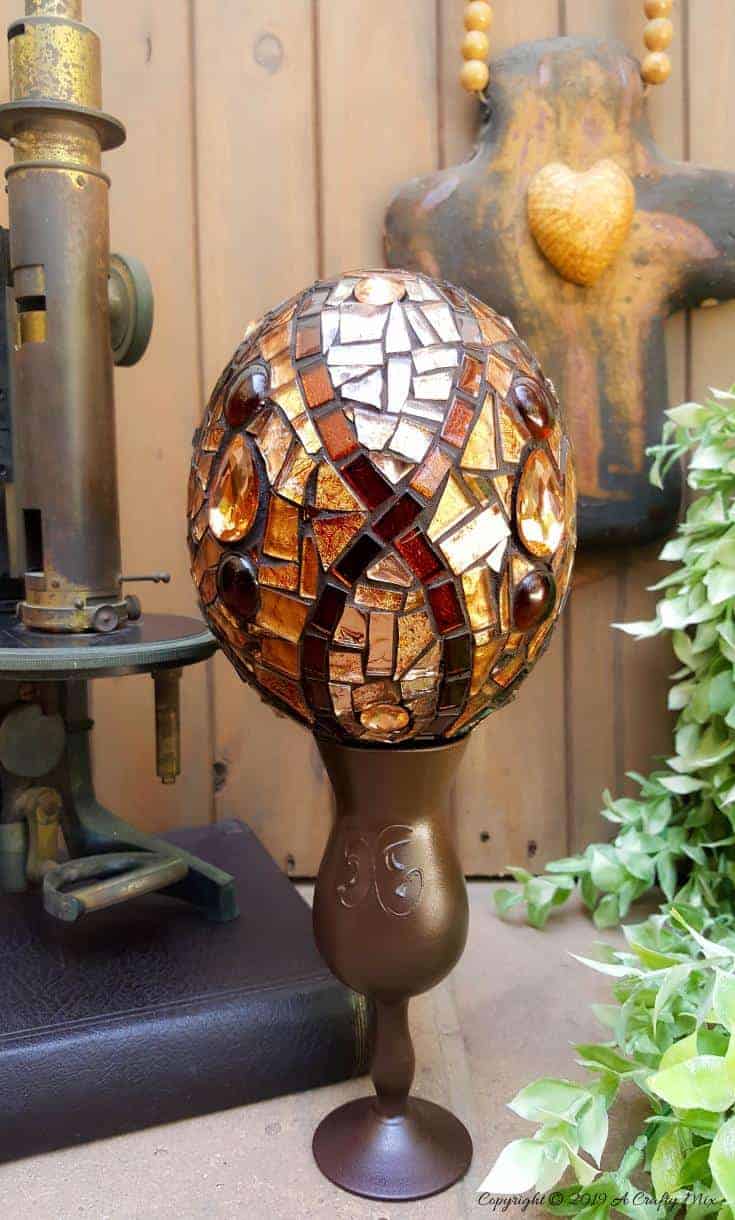
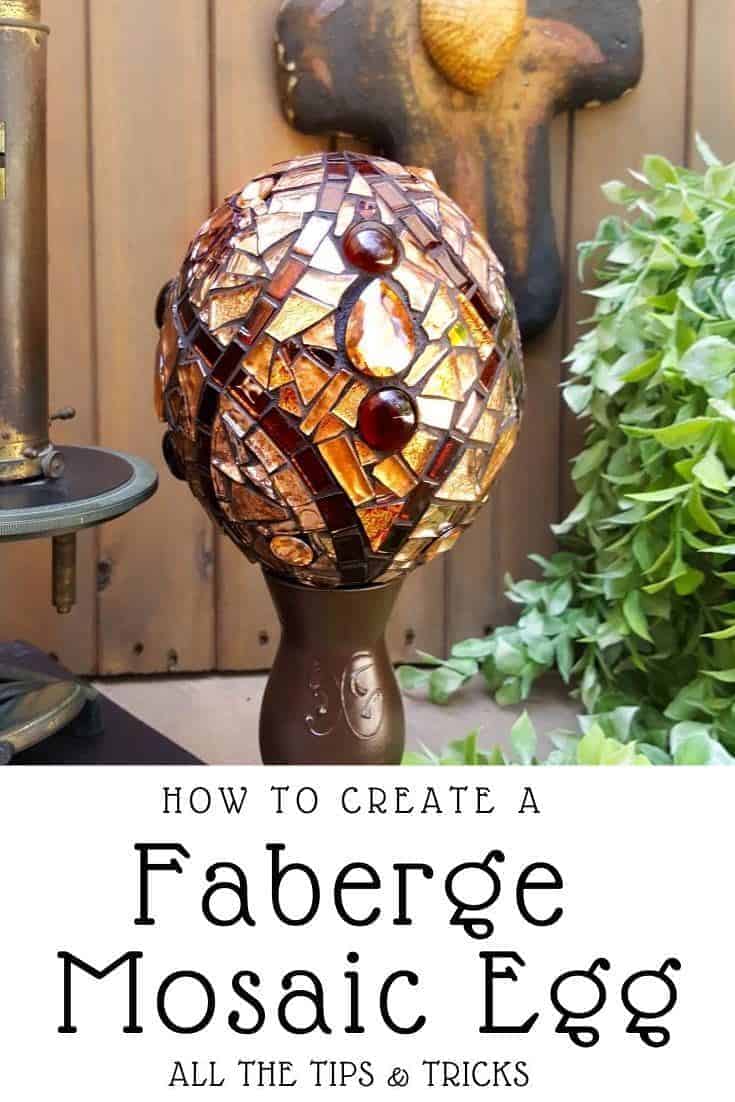
I don’t know what it is about mosaics, but every time I contemplate a new project, I lose all sense of reason. Case in point, last week. I bought a large hollow egg, thinking I’d spoil myself in December, when I have more time, and turn it into a mosaic Fabergé Egg. Riiiiight!!!! As soon as that egg landed in my shopping basket, I zoned out, and the only thing that went through my mind was how to get my Fabergé on. Seriously, nothing else mattered. Nothing. Not the kids, not the hubby, not the fur babies, not the garden, nothing. I couldn’t wait to get home so I could cut some tiles into itty-bitty little pieces and glue them down on a curved surface to make my own precious, one-of-a-kind treasure.

See, I get like that when it comes to mosaics. There’s just something so satisfying about taking broken fragments and putting them together to create a glorious, jewel-like piece of art.
So here’s me hoping that I’m not the only nutter mosaic addict out there and that maybe, just maybe, someone else would like to mosaic a hollow egg and turn it into a Fabergé egg. And maybe that someone needs a few tips and tricks to help them create a mosaic on a curved surface.
So this isn’t a tutorial per se. It’s more of a handy guide with lots of tips and tricks on “how to” mosaic on a curved surface and how you can use the power of broken pieces to create a “one of a kind” décor piece for your home.
But before we get to those tips and tricks, be sure to follow us on Facebook, Twitter, Pinterest, or Instagram. And don’t forget to subscribe so you’ll never miss a post!
Tips and Tricks to Mosaic on a Curved Surface
Adding tiles or tesserae (that’s the fancy word for a mosaic tile ) on a rounded or curved surface, whether it’s an egg, ball, or garden orb, can be tricky, but these tips will make it much easier.
Curved surface preparation
When mosaicking on a curved surface, it’s always a good idea to sand the surface first to roughen it up a bit and give the glue something to grip onto. The hollow egg I bought was made from clay, which is porous, so there was no sanding for me. Clay eggs aren’t that easy to find, but Amazon does sell jumbo plastic eggs, which will work too, if you want to make a Fabergé egg. Remember to wipe the surface after sanding to remove any dust. You can also make your own substrate with waves and folds using this tutorial.
Support your piece
If the form you’re mosaicking is completely round or oval, it needs to be supported to prevent it from rolling around. The Fabergé mosaic egg is quite big, so a roll of duct tape was perfect for keeping it steady.
You can also use a bag of rice or lentils to rest the form on while you work. Just pop them into a Ziploc bag, and you’re good to go.
Take your time with the design
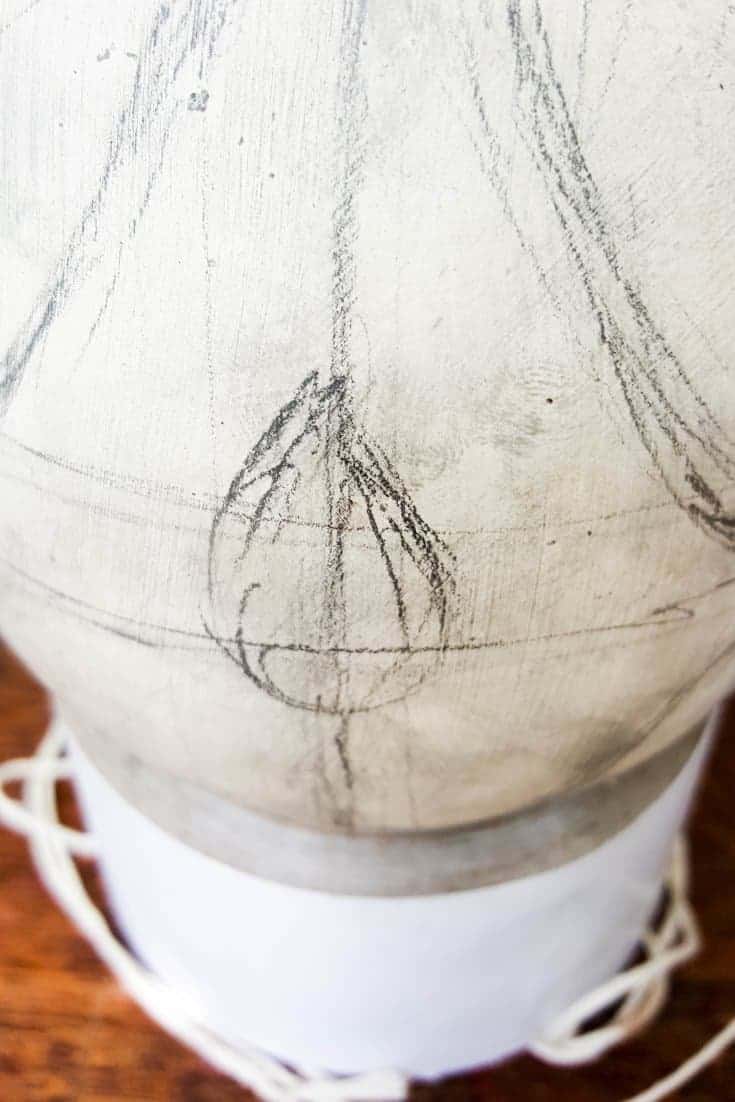
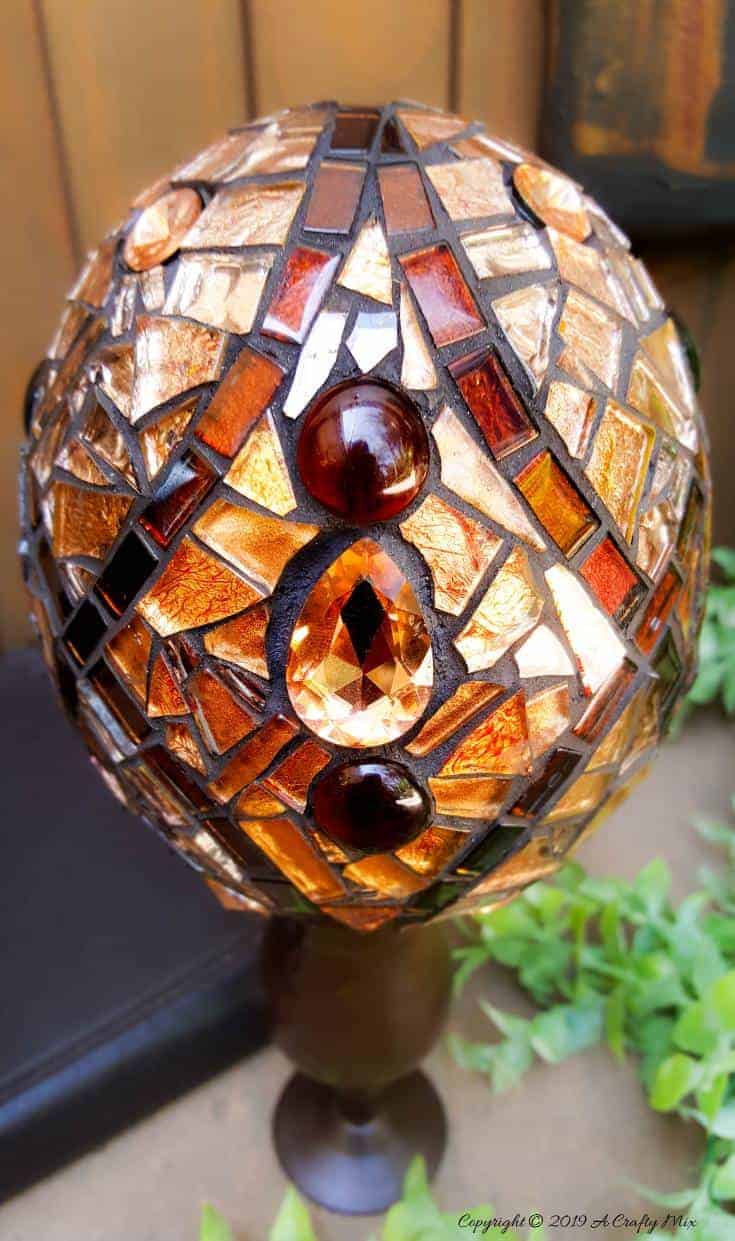
With this egg, I really wanted to emulate the beautiful, symmetrical designs you see in real Fabergé eggs. Which meant the egg needed to be split into equal sections. I assumed the hole on the egg form would be smack back in the center and initially used it as a guide for drawing the pattern. Um, nope. It was just off-center enough to give me grey hair and have me rubbing the design out a gazillion and fifty-three times. Look at the egg from the top and work from there. I finally used a piece of string to divide the egg into sections before drawing the design.
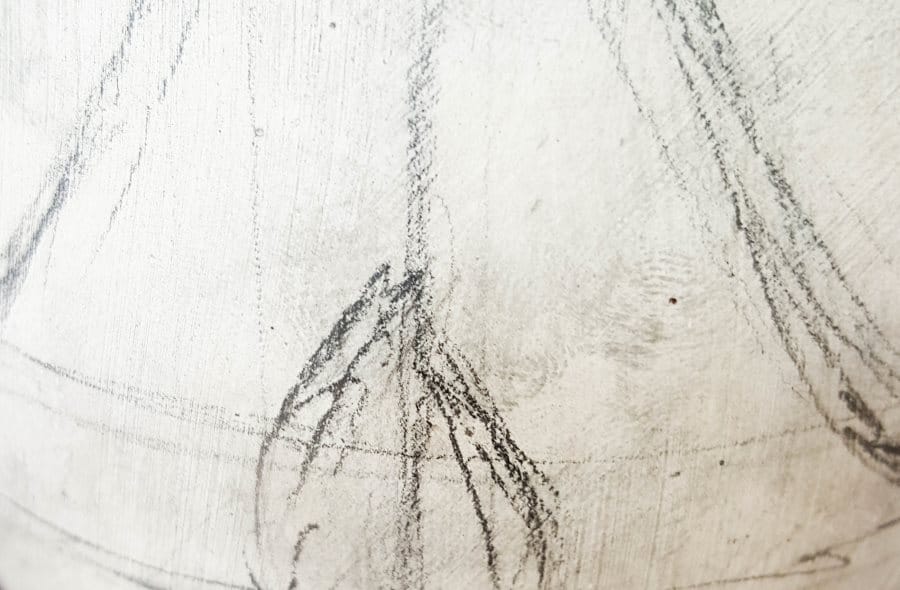
When it comes to the design, it’s always best to use something that’s not too fussy. Simple lines and shapes work well.
Choosing tile colors
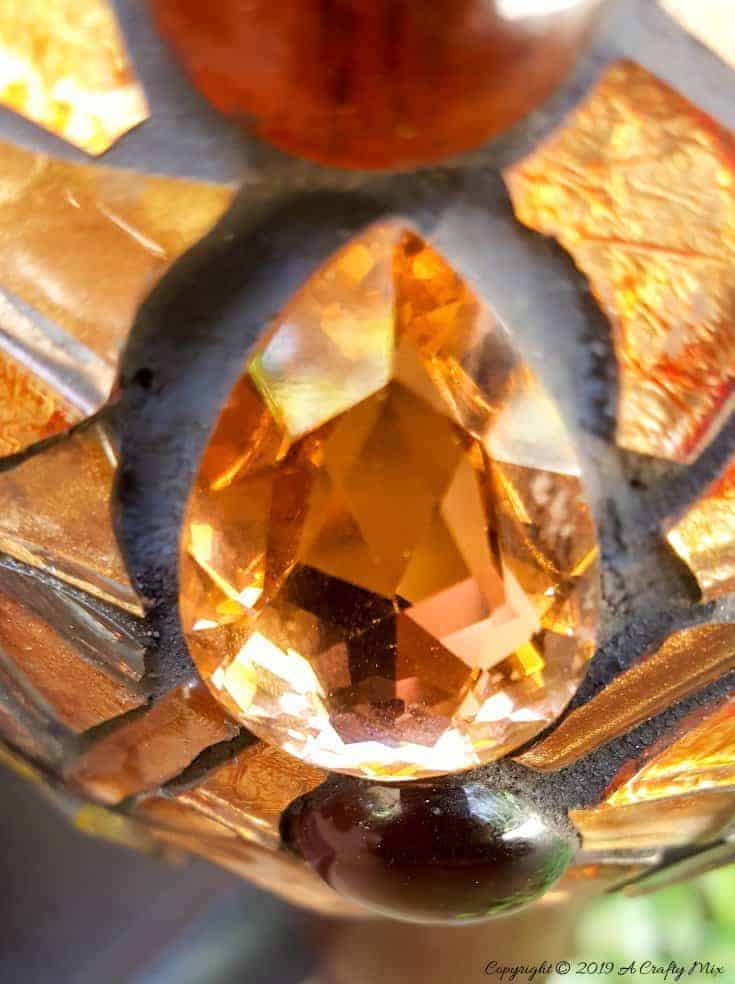
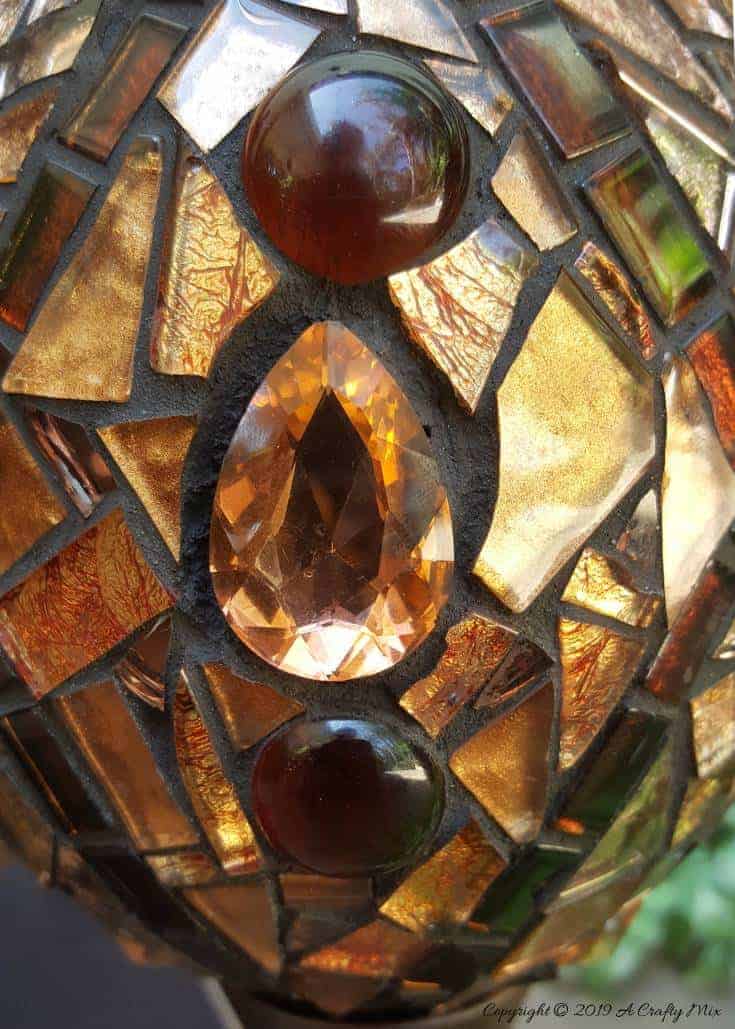
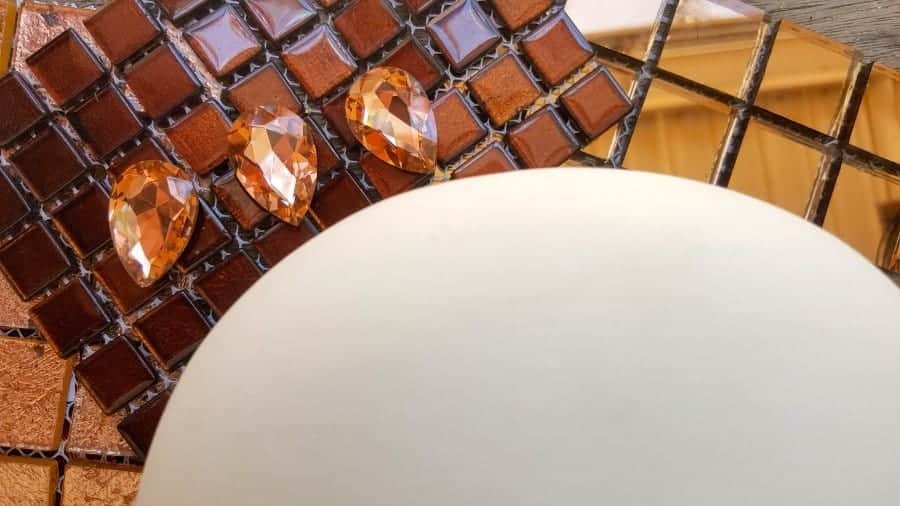
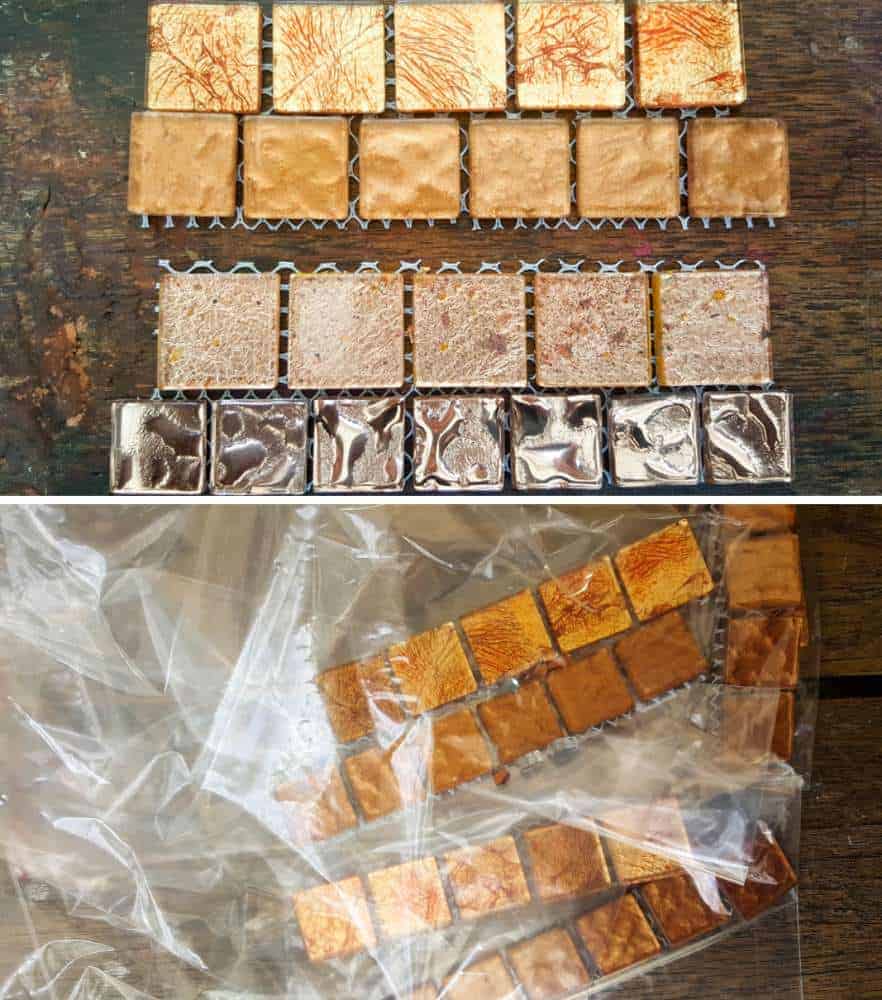
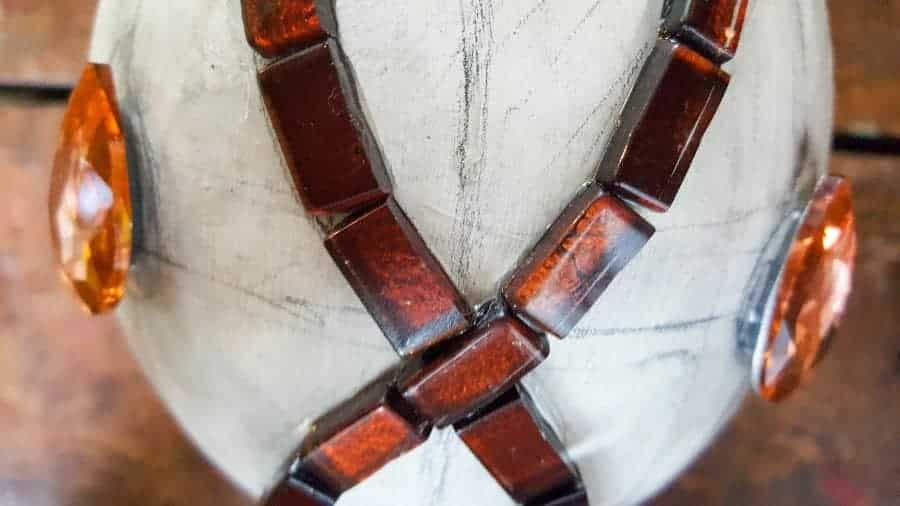
When choosing the tile colors for your mosaic, don’t be afraid to play around with different color combinations. For the Fabergé egg, I didn’t want the faux crystal teardrops to overpower the piece, so I went with ambers, coppers, and browns.
Color takes on a different hue based on the surrounding colors. So experiment before you cut and glue your tiles down. Once you’re happy with your color choice, split them into equal piles and put them in bags to avoid accidentally overusing one color combination and not having enough to finish the piece.
Use the right glue
When it comes to mosaics, one of the most important tips is to use the right glue. It needs to be strong, tacky, and dry clear, especially if your tiles are transparent. If your finished piece is going outside, the glue needs to be waterproof too. My favorite mosaic glue is E6000 Plus or a silicone adhesive.

It ticks off all the right boxes, and it takes a while to dry, which means I can reposition the tiles before the glue sets permanently. The only downside is you have to wait for the glue to set before moving on to the next section. Use the drying time to stand back from your creation and double-check that the pieces are where they should be. And take a few photos too. I find that they always give me a better idea of whether the colors work together.
Don’t be scared to pry some of the tiles off if you don’t like something. Just remember to remove all the old glue so that when you stick another one down, it’s not wonky or higher than the other pieces.
Cutting the tiles or tesserae
The pattern I drew on the mosaic Fabergé egg called for a combination of tile shapes:
- Rectangles to create a design outline
- Randomly shaped tiles to fill in the outlined area
To cut rectangles, place the cutting wheels on the cutter in the center of the tile and apply firm and steady pressure downwards on the handle to cut.

For the random tiles, point the cutting wheels in different directions on the tile to create odd shapes and sizes. Try to avoid cutting similar shapes. Turn the tile and cut/snip triangles, rectangles, squares, quadrilaterals, and trapezoids. Nine times out of ten, they will all magically find a place in the end.
Keep any little off-cuts that don’t quite fit in small containers and use them to fill in large gaps later. You’ll be surprised at how often you find an almost perfect match.
When you need a specially shaped tile and you can’t find it in your off-cut containers, place the tile where it needs to go and use a non-permanent marker to mark where to cut. Put the wheels of the cutter on the mark and push the handles down firmly to cut. You can also make your own clay tiles to add something unique to the finished piece.
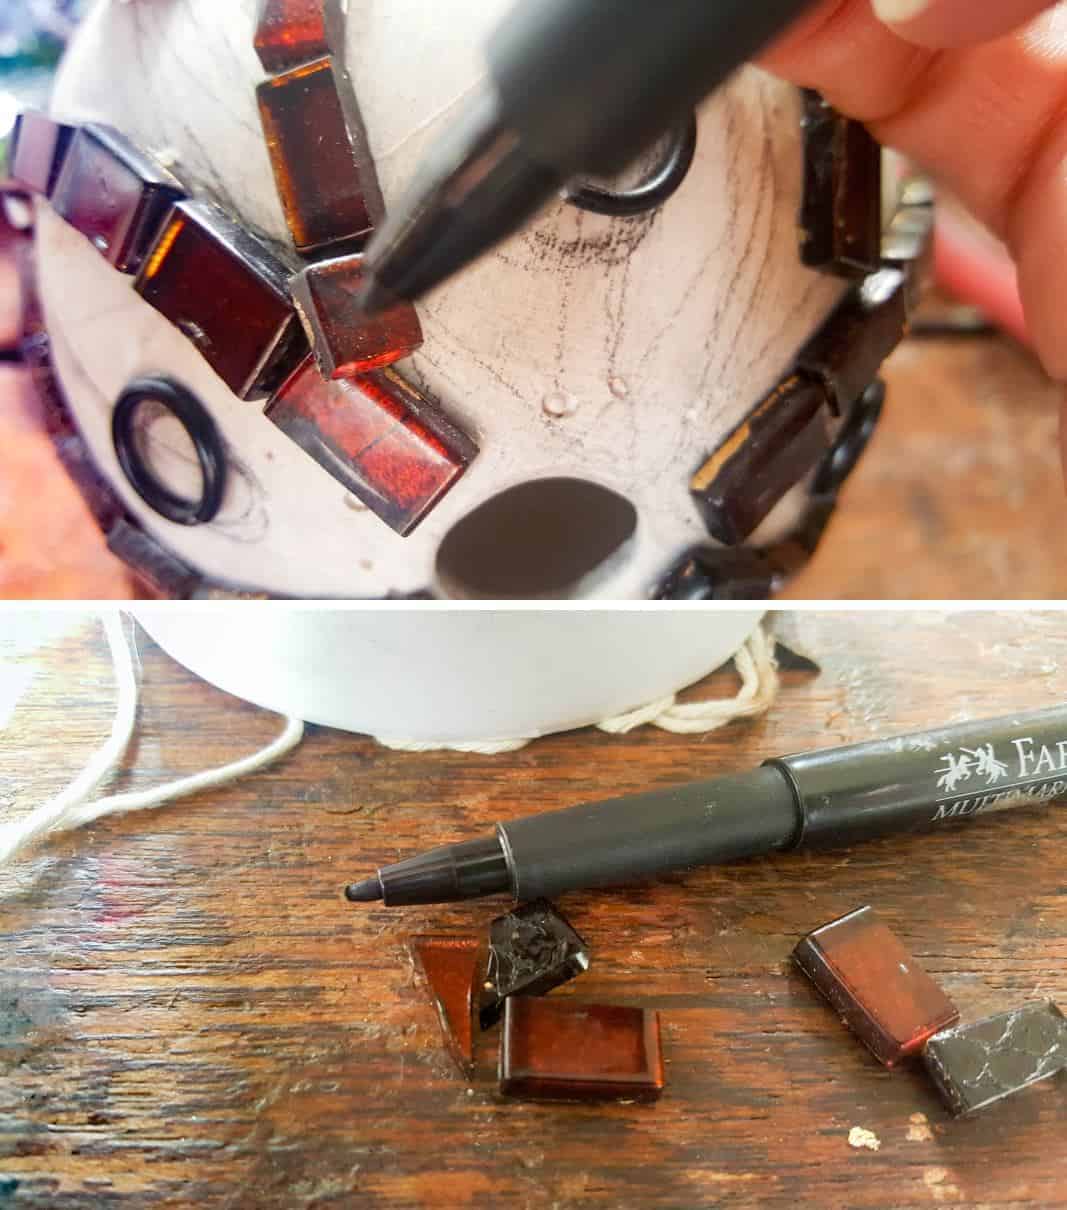
You can eyeball the size and shape of the piece you need, but in my humble opinion, a marker is far more reliable. Don’t stress too much if the tile isn’t an exact fit; tiny gaps will be filled with grout later.
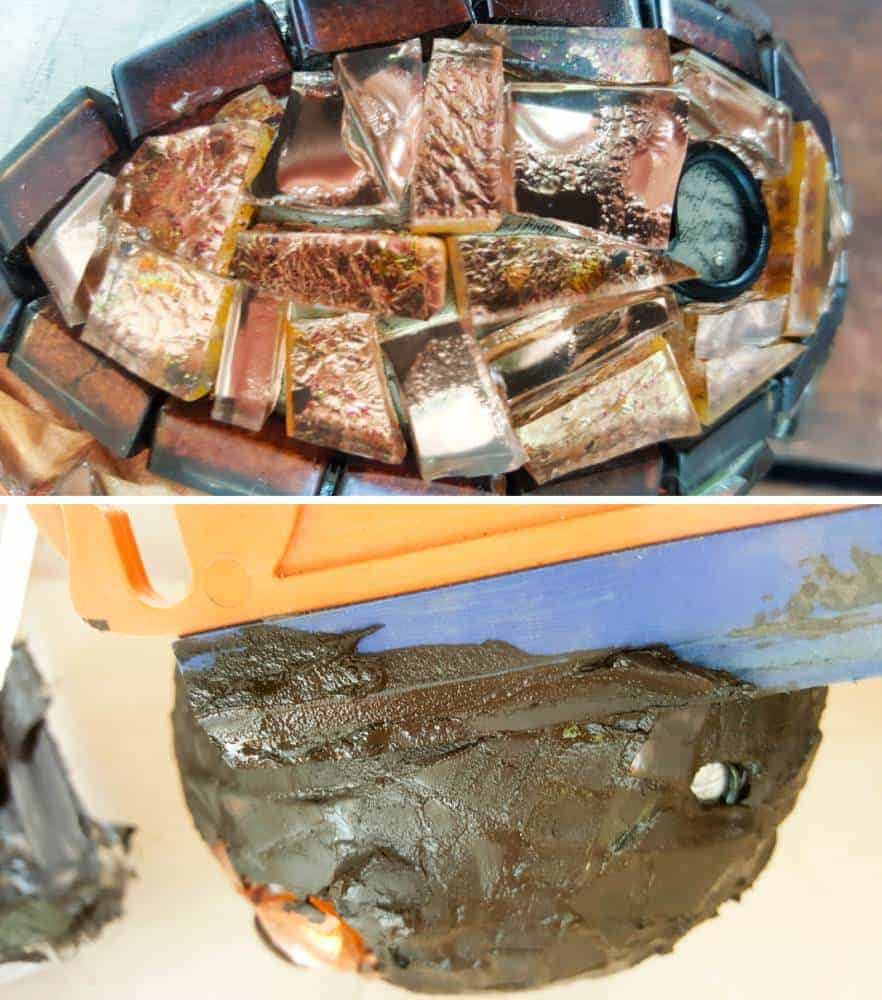
Work from the outside in
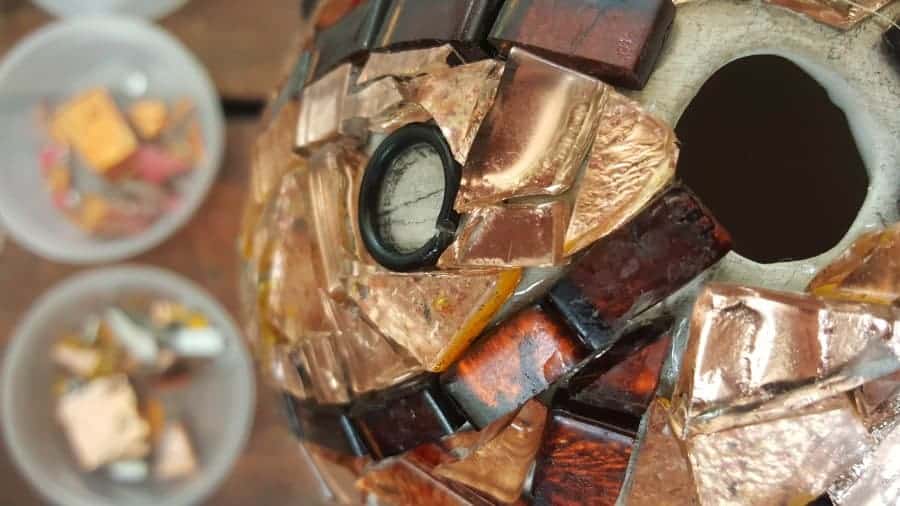
I prefer to work from the outside inward. It helps demarcate the design and creates a well-defined area to work in. With curved surfaces, it’s best to focus on small areas at a time to keep the pieces from sliding around. For the mosaic Fabergé egg, I glued the rectangular tiles down first before adding the large faux crystals. Once the glue dried, I moved on to placing the random tiles.
Fitting tiles on a curved surface
Most tiles have flat bottoms, and depending on the roundness of your curved surface and the size of your tile, you may need to cut the tile into two or more smaller pieces so it fits neatly around the curve. If you look at the piccy below, the tile stuck out too far, which would either cause it to break over time or fall off completely. Cut mosaic tiles are also really sharp, so it’s not a good idea to have them sticking out all over the place.
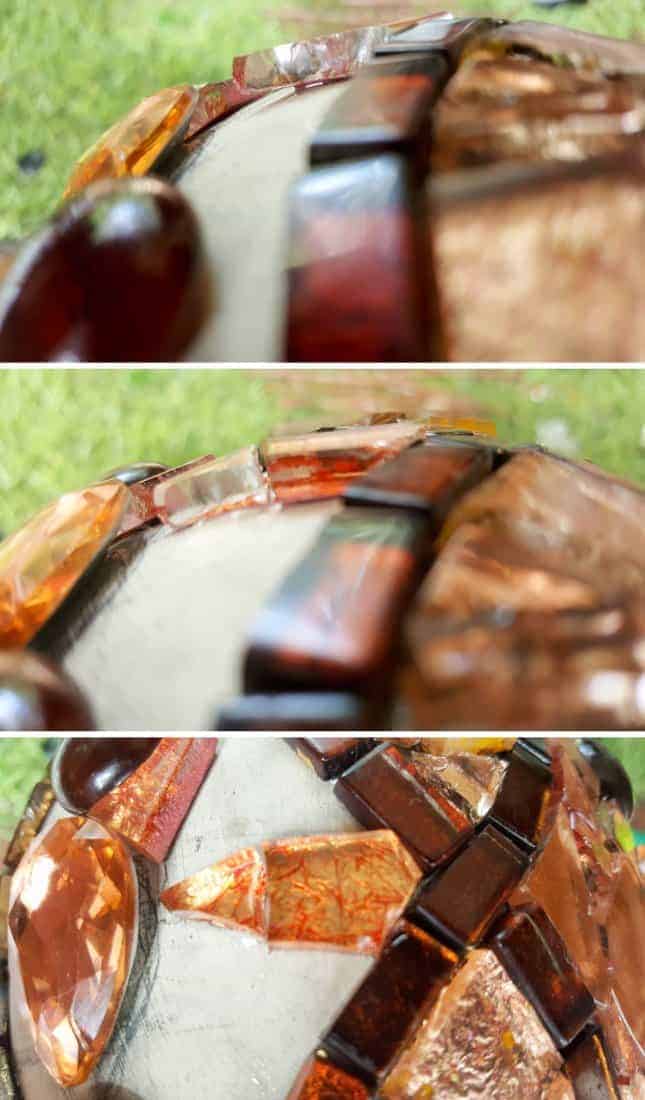
Cutting the tile into two pieces, it fits along the curve far better.
Saving space for unusual tiles
When the tiles or media you use in your mosaic are oddly shaped, or there isn’t enough surface area for the glue to adhere to, it helps to “save a space” for the tile and add it later. Like the smaller crystals I added to the Fabergé egg. They had a pointy bottom and kept toppling over while the glue was drying.
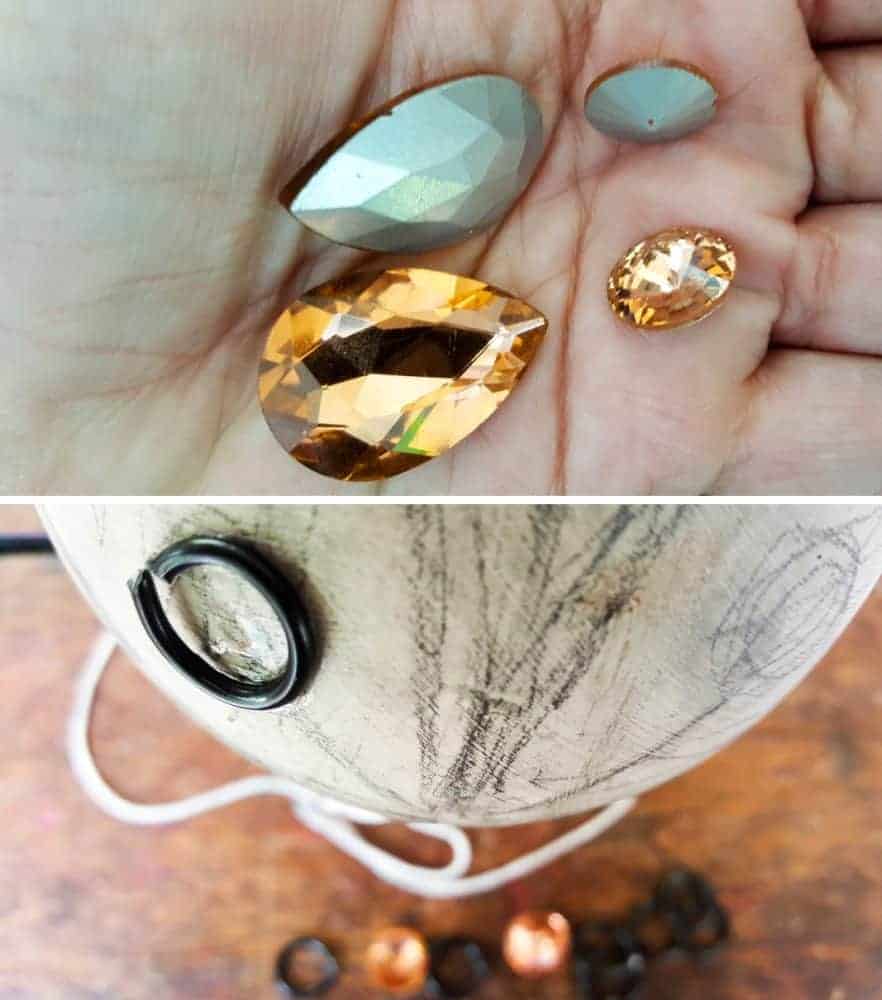
To solve the problem, I used jewelry wire to “save a space” for them. The crystals were glued in after grouting the Fabergé egg.
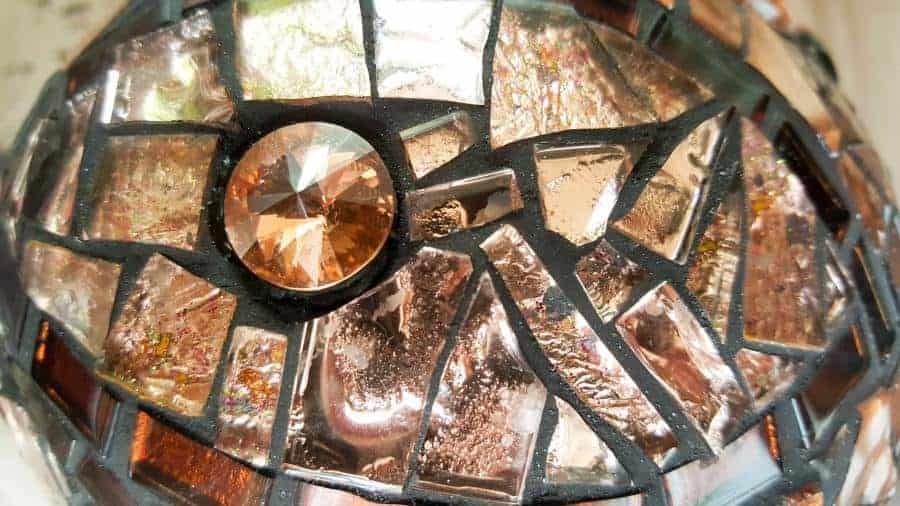
Don’t you just love the way the black grout makes the tile colors come alive? You can also use a thick piece of cardboard and cut it into the right shape. Add the cardboard shape with double-sided tape and gently pry it loose after grouting. You can then glue your odd-shaped tile or other objects in place and fill any gaps with a little bit of grout.
The space-saving trick also comes in very handy when you’re using cheap beads that may get damaged when you grout. Grout is pretty abrasive. You can test how “grout resistant” the beads are by rubbing a little grout mixed with water over the bead. If the color or coating comes off, you’ll need to use a space saver or buy more expensive beads.
Grouting curved surfaces
Applying grout to a curved surface is pretty much the same as grouting a flat surface, with one exception. Most of the time, I can get away with using a popsicle stick to apply the grout and get it into all those gaps. For curved surfaces, a small rubber-edged grout float or squeegee works best. Look for one with a soft rubber front so it bends over the curves.
If you used “space savers”, be careful not to overfill the area with grout. Ask me how I know. Don’t worry too much if you slip up. Just use the pointy end of a skewer stick to scrape some of the grout away. You’ll find a whole bunch of other grouting tips here.
Creating a mosaic on a curved surface can be challenging. But don’t give up. At the end of the day, it’s worth it when your project is finished.
If you use these tips and tricks to apply mosaics to those darned annoying rounded surfaces, it won’t be a problem at all. If you’re not comfortable with going all out and making a Fabergé egg, you can make this cute heart doorstop instead to get your mosaic groove on. Or if you’re little more adventurous you can try this dazzling faux cloisonné pomegranate. But be careful; it’s addictive.
So what do you think of the mosaic Fabergé egg? Have you tried a mosaic on a round, curved surface? Do you have any tips to share?
If you enjoyed these tips and tricks to mosaic on a curved surface, don’t forget to pin it for later.

Or if you want to make a mosaic Fabergé egg to add to your decor.
Psssst, can I tell you a little secret? I am going to have to buy another hollow egg coz I want to make a blue one and a green one and try a different pattern and ………. oh lordy, here I go again.
Oh, BTW, if you’re looking for some of the things we used, we’ve got you covered. Disclosure: Clicking on the links below means we may receive a commission from Amazon. But don’t worry, it won’t come out of your pocket, and it helps us come up with more amazing craft ideas to share with you 😉


Mosaic Tools

Or if you prefer to buy rather than DIY


Until next time, wishing you a wonderful, crafty week filled with lots of love. Thank you for popping in for a visit.

Last update on 2026-06-03 / Source Amazon Affiliates