Looking for an adorable, goblin core-inspired project? Meet the Forest Ball Sprite – Mr. Xii Ballisimo.
![]()
Isn’t he adorable? I wasn’t too sure what to call him. He’s part troll, part furby, all combined with an overactive imagination and a love of fantastical creatures.
![]()
With mossy hair and an acorn cap, this charming clay cutie is super easy to make, no matter what your skill level.
![]()
But, before we get to the tutorial, do me a favor and follow us on Facebook, Twitter, Pinterest, or Instagram. And don’t forget to subscribe so you’ll never miss a post!
What you need
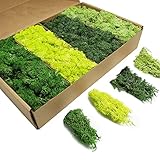
- Fake moss for potted plants
- Clay (foam, air dry or polymer clay will all work)
- Clay ball stylus
- Flesh coloured paint
- Acorn cap
- Glue
Optional to mount Mr Xii Ballisimo
- Wooden box frame
- Piece of bark
- Reindeer Moss/lichen
- Conk or Turkey Tail Mushroom

How to make a Forest Ball Sprite
This tutorial is in two parts. I’ll start off by showing you how to make Mr. Xii Ballisimo, and then we’ll explore creative ways to put your Forest Ball Sprite on display. I’ll walk you through mounting him in a box frame, as well as suggest other fun options – think curly top mushrooms, driftwood, tree stumps, terrariums and whole bunch more.
![]()
Part 1 – Making a Forest Ball Sprite
Mr Xii Ballisimo gets his name from the number of clay balls you need to make to bring this cutie to life. Yup, if you can roll 12 clay balls in various sizes, you’ll have a collection of Sprites in no time. This is what they look like before they’re all dressed up.
![]()
To show you how it’s done using foam clay watch the video below.
And there you have it -your very own Forest Ball Sprite. Easy, right? Now, all we need to do is dress the Sprite up. Since Mr Xii Ballisimo is a mystical forest creature, an acorn cap hat and a mop of curly, mossy green hair seemed appropriate. Because this little guy is quite small, I propped him on a toothpick first.
![]()
It makes it easier to color and dress up.
![]()
When it comes to giving him some color I used skin toned powdered food coloring.
![]()
Ever since I shared this antique clay bottle tutorial, food coloring has become my new favorite medium for adding soft color to something. The vampire ball sprite lower down in the post was done with old foundation. Play around and use what you’ve got. Once you’re happy you can dress him up. I chose an acorn cap and a mossy yarn for Mr Ballisimo.
![]()
Just glue short pieces of the moss yarn inside the acorn cap.

And then glue the acorn cap on top of Mr Ballisimo’s head.

For eyes, I used black glass head pins that I cut shorter. You can also draw eyes or give him long bangs and skip the eyes completely. People will think they’re hiding under all that hair. Small googly eyes will work too.

Creative ways to customize your Forest Sprite
- Instantly transform your Forest Sprite into a woodland librarian by adding glass. You can see how to make some in the stool sample tutorial.
- Swap out moss or faux greenery for fluffy yarn or wool. Choose natural colors for an earthy vibe or go bold with bright shades for a playful twist.
- Replace the acorn with a curly top clay mushroom or Leprechaun styled top hat for a dapper flair.
- Or, channel a gothic look by adding dramatic wings and faux spider web hair for a bewitching vampire styled sprite. That funny looking hat on his head is coconut coir that I painted black.
![]()
Just have fun and experiment.
Part 2 – Putting Forest Ball Sprite on Display
My Mr Xii Ballisimo sits on a faux turkey tail mushroom. (Note to self – remember to share that easy tutorial!!!). I glued the mushroom to a piece of bark which I put inside a box frame. You can find a tutorial to make a shadow box frame here.
![]()
Give the piece of bark a good scrub with a brush to get rid of any dirt and grime.

Use a wire brush and flapper disc to distress the box frame. The wire brush gives it a rugged, lived-in texture by bringing out the wood’s grain, while the flapper disc smooths out any rough spots. To take it to the next level, I applied wood burning paste on the frame for a controlled yakisugi finish.

I wanted the frame to look old and worn instead of “newly-cobbled-together”. It kinda felt right and talks to the whole goblin-core aesthetic I was going for.

Stain or paint the inside of the box frame and glue the bark down.

For that woodland feel, glue moss on and around the piece of bark.

I used a combination of craft moss and homemade bath sponge moss.

Finish off by gluing the faux turkey tail mushroom to the bark.

Pop Mr Xi Ballisimo on top. If you’re worried he might fall off, you can glue him in place.

More ways to put your Sprite on display
- Nestle him inside a tiny planter among succulents for a woodland-meets-houseplant vibe.
- Add a magnet and let him peek out from your refrigerator or locker.
- Hide him among moss and rocks in a terrarium or glass jar habitat.
- Put him on top of a pen or pencil case for a whimsical desk companion.
- Attach him to a wreath for a year-round magical door decor.
- Make a family of sprites and pop them on a piece of driftwood or a seashell.
Whether he takes up residence on your bookshelf, adds a sprinkle of goblin core magic to a fairy garden, or becomes a whimsical gift, this little forest sprite is sure to bring smiles wherever he goes.
![]()
So that’s it for today. I hope this tutorial has sparked your imagination and inspired you to create your own tiny wonder. Don’t forget to tag us on Instagram or Facebook if you make one. I would love to see how you dress up your little 12 ball sprite. There’s always room for a more magic in the world.
And if you like the idea of making a Forest Ball Sprite, don’t forget to pin the tutorial for later.
![]()
Sharing is caring.
![]()
Oh, and if you’re looking for some of the things we used, we’ve got you covered. Disclosure: Clicking on the links below, means we may receive a commission from Amazon. But don’t worry it won’t come out of your pocket, and it helps us make more amazing crafts to share with you ;-)


To put Mr Xii Ballisimo on display

Or if you prefer to buy rather than DIY, then perhaps these beauties will appeal.


And as always, wishing you a wonderful, crafty week filled with love and laughter. Thank you for popping in for a visit.
