If you’ve been following our blog for a while, you’ll know I’m a little obsessed with making things for our fairies. Especially if they involve a few simple supplies and upcycled stuff like our tin can Gypsy wagon or this fairy bay window. So, forgive me if I share another craft tutorial for these enchanting beings. This time we’ll be making this magical upcycled faux wood fairy garden door.

It’s a bit of a mouthful to describe such a little thing, but I think she looks magical from both sides.
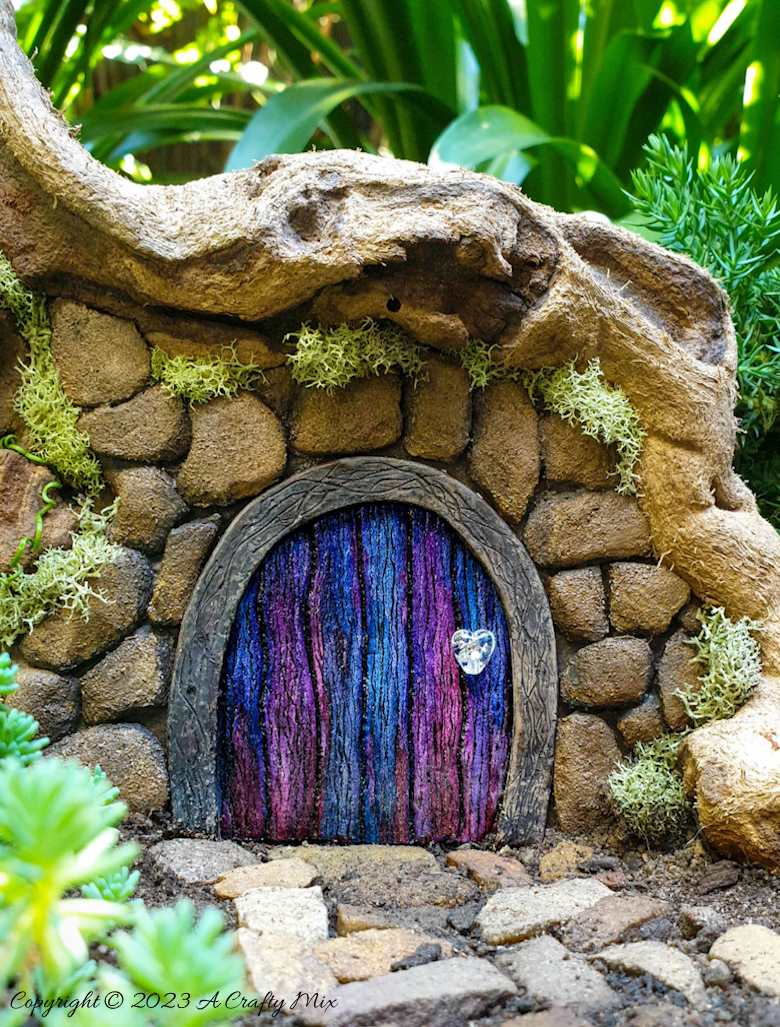
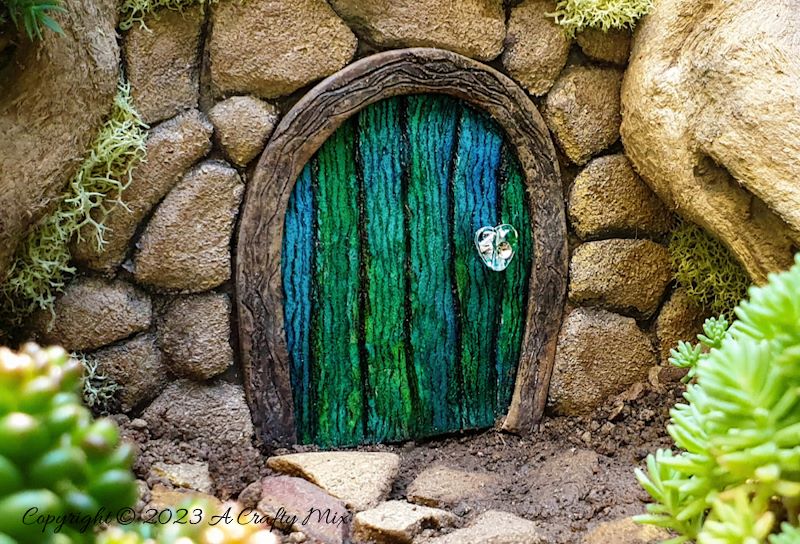
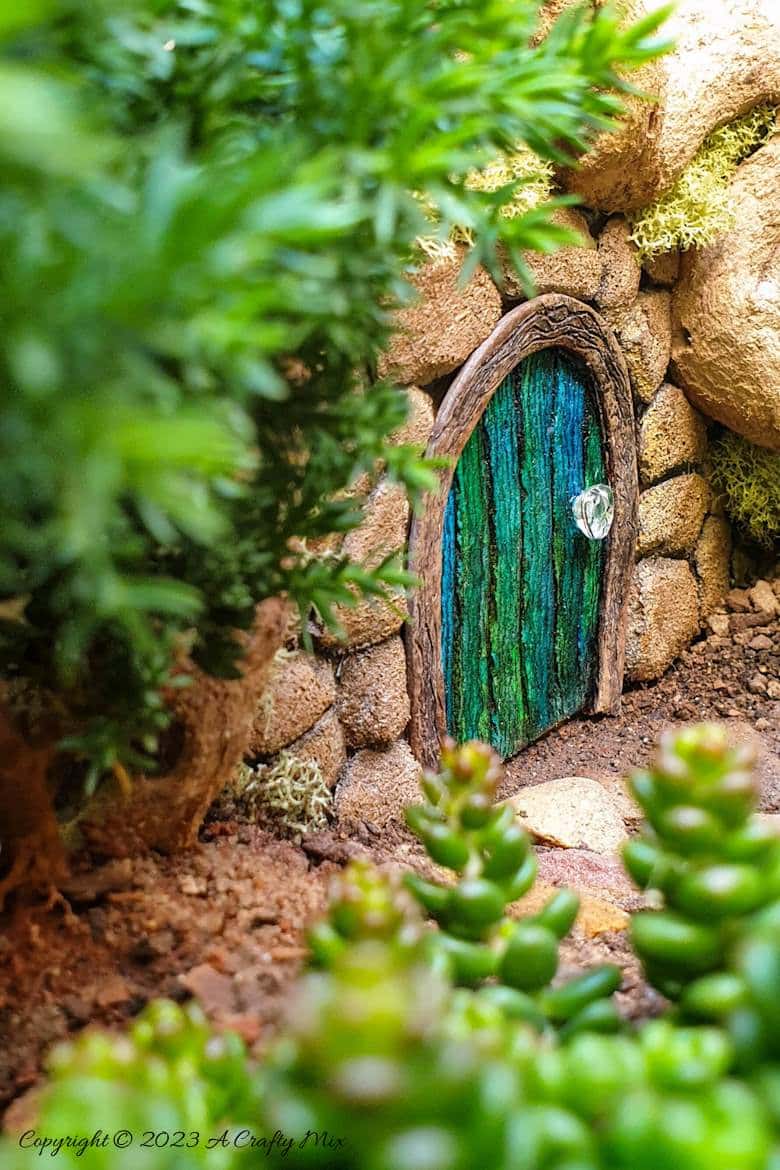
The wooden door and stone cladding is made entirely from a upcycled take away dish. And unlike this toilet paper fairy door it won’t disintegrate into a soggy mess after the first rains.

Plus you don’t need any special tools or fancy craft supplies to create that faux wood effect.
In this easy DIY project tutorial, I’ll show you how to make your own enchanting faux wood fairy garden door. But, before we get there, follow us on Facebook, Twitter, Pinterest, or Instagram. And don’t forget to subscribe so you’ll never miss a post!
Oh, and keep any eye out towards the end of the tutorial for 2 more doors that involved repurposed or upcycled materials.
Craft supplies you’ll need
- Take away polystyrene dish
- Acrylic paint or alcohol inks
- Toothpicks
- Paintbrush
- Sponge
- Craft knife
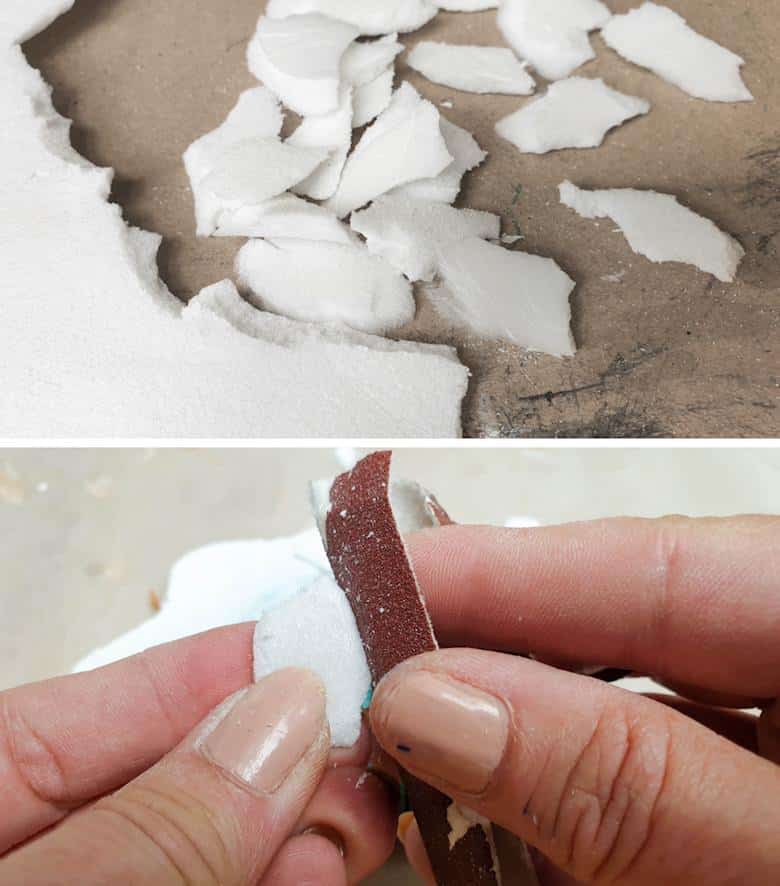
- Sandpaper
- Elmer’s glue or wood glue
- Polymer clay (optional)
- A gorgeous branch or vine
You’ll also need decorative pieces to create a door handle and hinges. Look for gems, buttons, or any small pieces you have lying around.
Making an upcycled faux wood fairy garden door
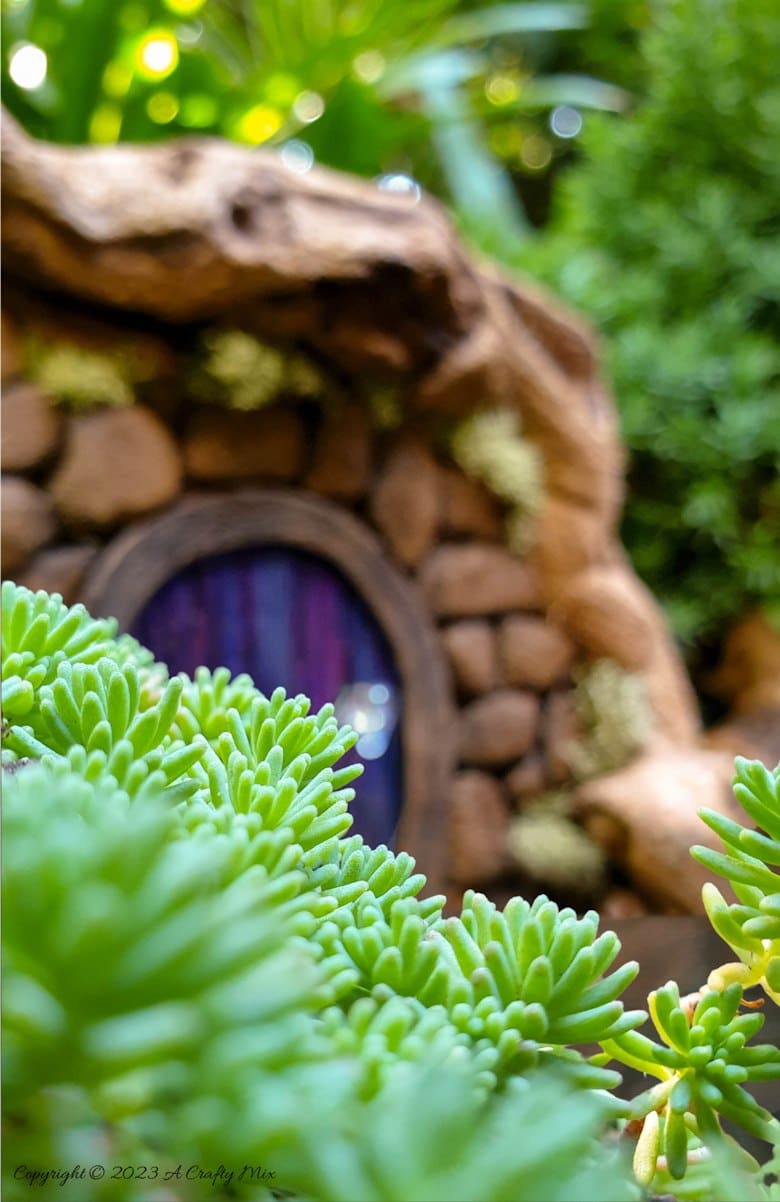
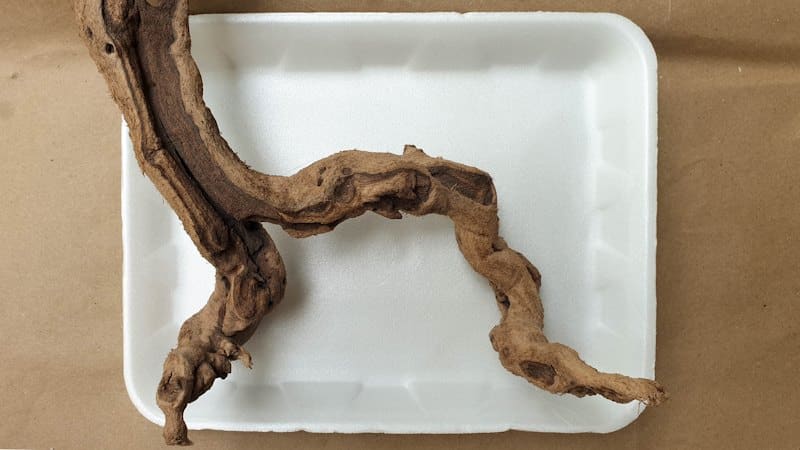
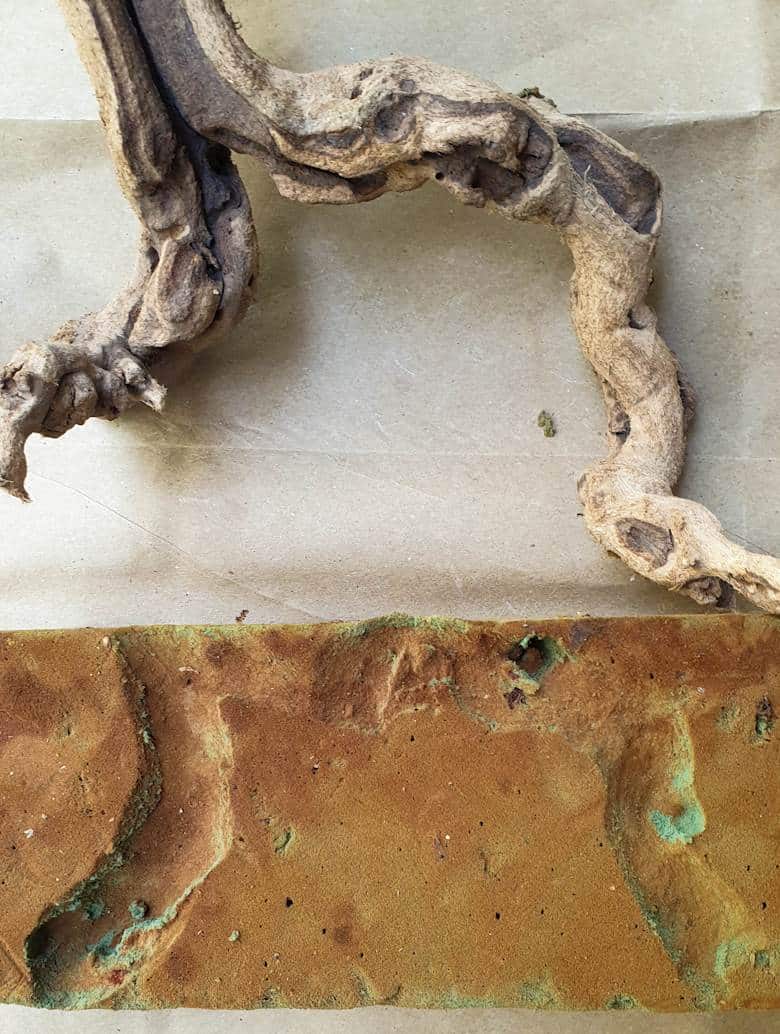
The DIY fairy door is made from a discarded polystyrene dish. It’s an easy way to reuse what you’ve got and create a little bit of everyday magic at the same time. Depending on where you’ll be putting your little door you may need to make a wall of some sorts to support it. My door is under a beautifully shaped vine, with lots of bends, nooks and crannies.
The best way to get the walls and door to fit into something like that is with a template. If your door is going up against a flat surface, you can just skip the template making part below.
Making a template
One of the easiest ways to make a template from an intricate shape is to use florist foam. It’s also one of the cheapest. Place the shape (in my case a vine I got from Namibian Hardwood) onto a block of florist foam and squish in down firmly but gently.
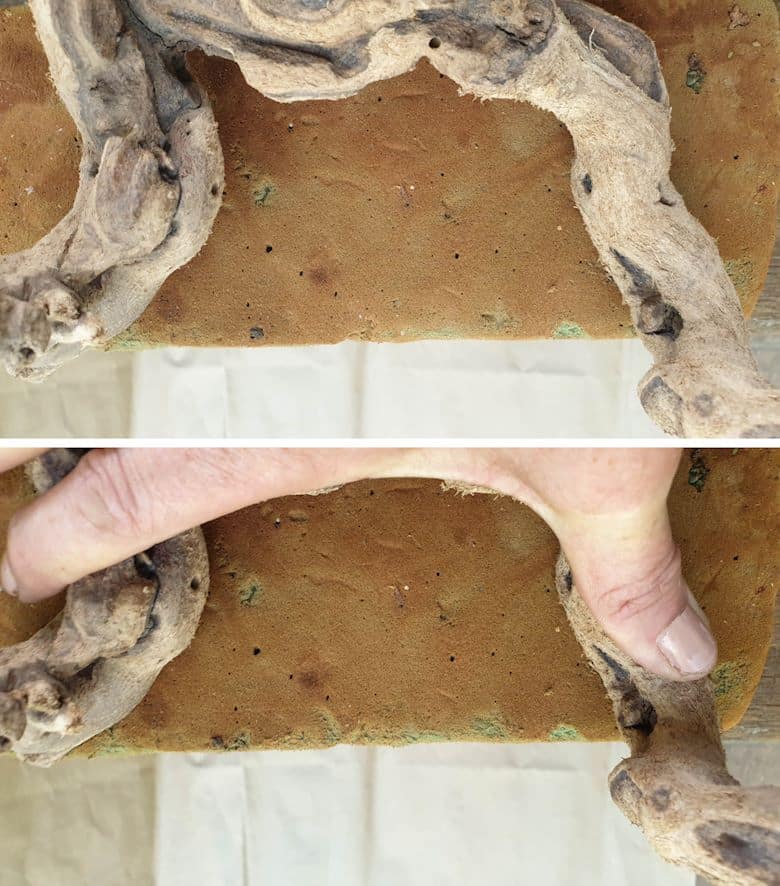
The shape will leave an “indent” in the foam as shown below.
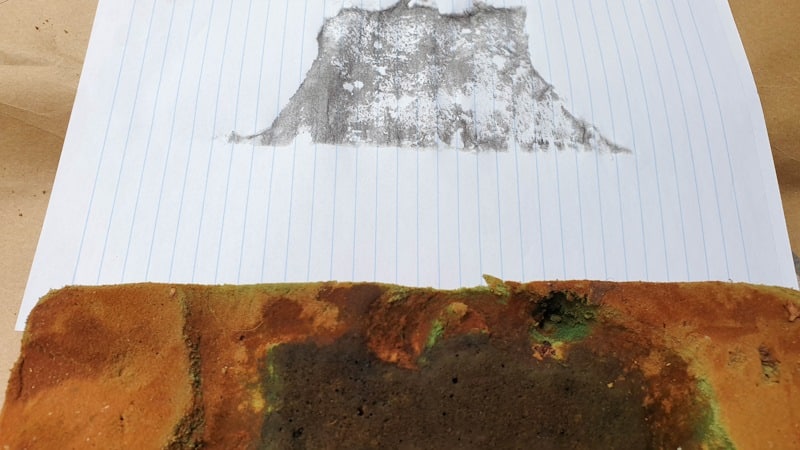
Wet the florist foam with watered down paint.
Place a piece of paper on the florist foam while the paint is still wet, and pat it down. It should absorb the paint and leave a mark that you can use as a template for the polystyrene fairy door.
Refine the template by test fitting it in the space you’ll be building the door and cut away any excess.
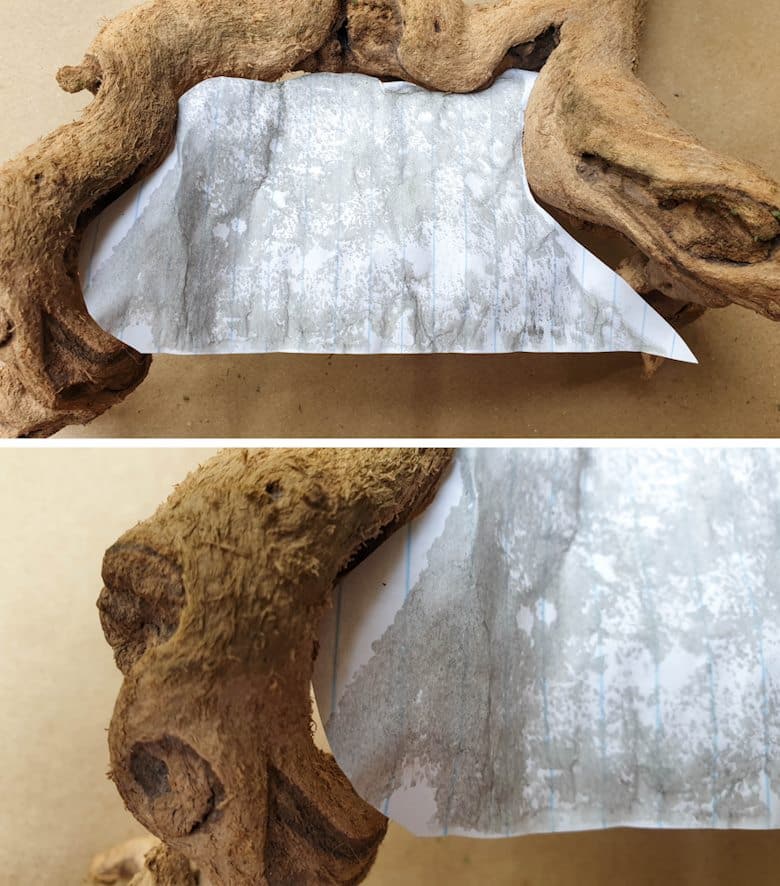
Don’t worry if it’s not an exact match. Polystyrene is easy to cut and any obvious gaps can be filled with moss later. Once you’re happy with your design, transfer the template to the polystyrene dish.

Use your craft knife crafting wand to cut the shape out.

Test fit the shape and trim away any excess.

Making the fairy door
Start by sketching out a fairy door shape on a piece of paper. It can be a classic arch, rectangle, or something fantastical. It’s your little door so let your imagination run wild. The hobbit inside me took over and I went for a simple round door.


Adding wood grain and planks
To mimic the appearance of planks and wood grain, I used wooden toothpicks.
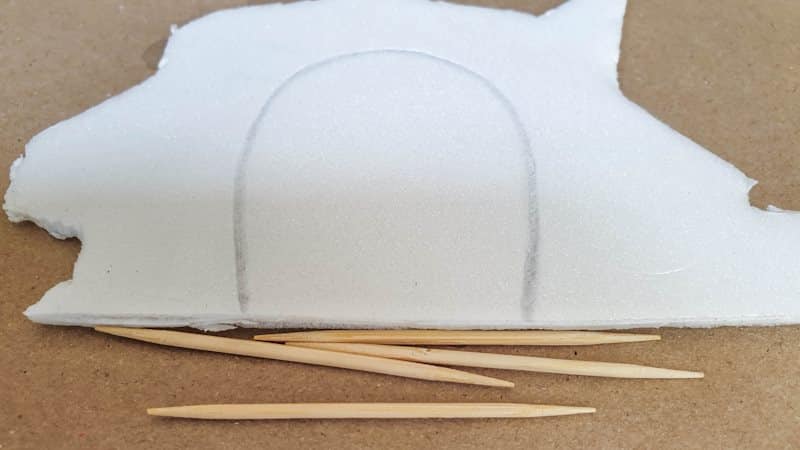
Those innocuous sticks come in so handy for something like this. By cutting the tips off and varying the pressure of your drawing strokes you can control the depth and thickness of the lines.
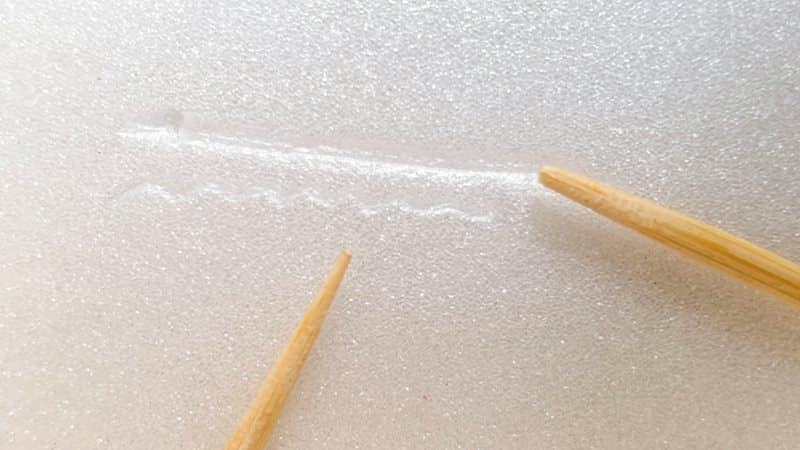
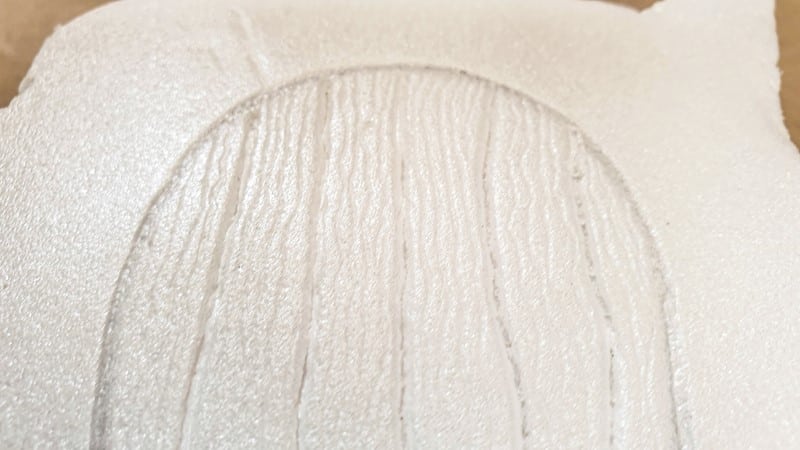
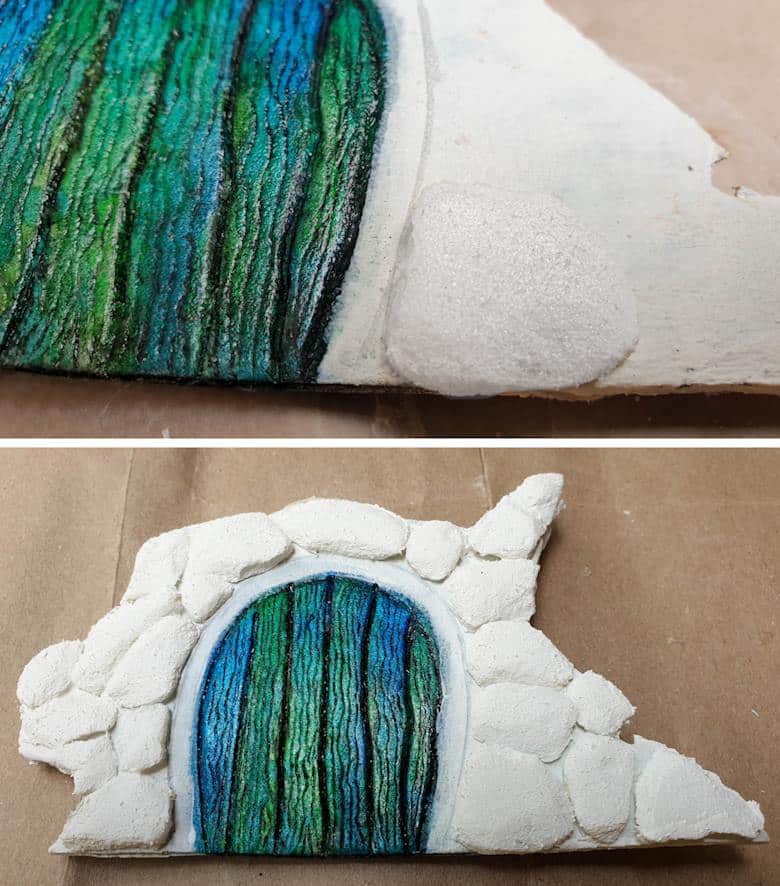
I used a blunt toothpick to score equally spaced lines into the faux wood fairy door. These lines form the gaps between the wooden planks. Press down firmly when making the lines and don’t worry too much about keeping them straight.
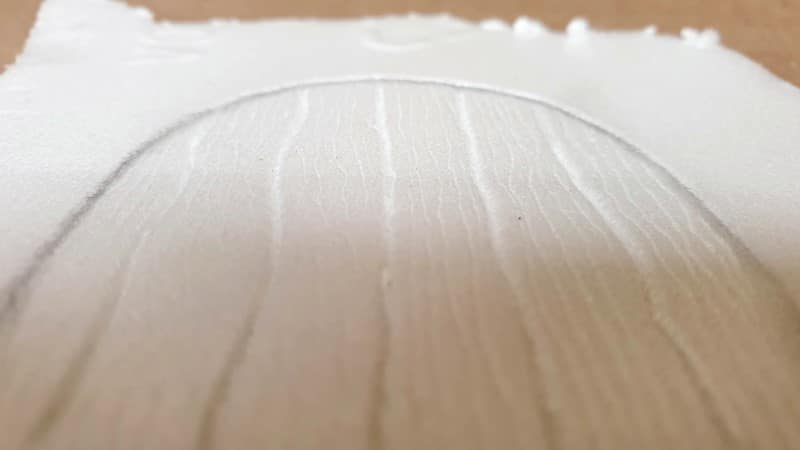
Lightly draw squiggles, curves, and knots using a sharp toothpick to create a wood grain effect. Vary the pressure to make it look more realistic and time worn. For a deeply weathered look “scratch” the polystyrene with a wire brush. It’s a quick and easy way to give your door a wooden makeover without the lumberjack hassle. My little door is a bit small, so I only used toothpicks.
If you’re going to use your mini door somewhere where you’ll see both sides, repeat the process on the other side.
Painting the faux wood fairy door
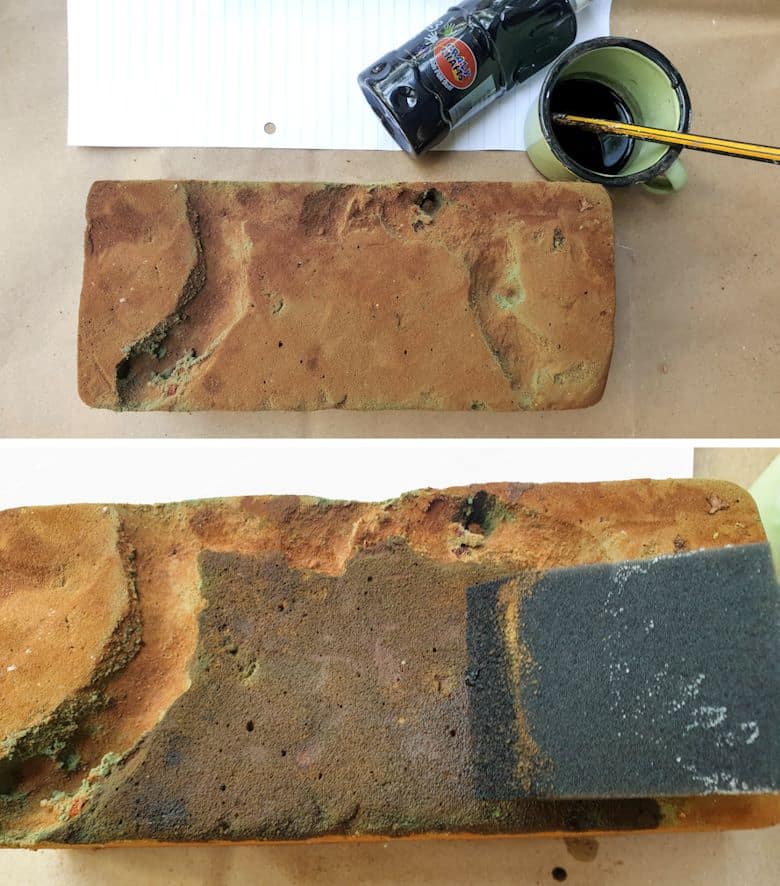
Once you’re happy with the overall effect, it’s time to start painting. Mix a little black paint with water so it’s slightly runny. Brush it onto the fairy garden door and immediately wipe it off. The black paint should settle in all the toothpick groves you made earlier.
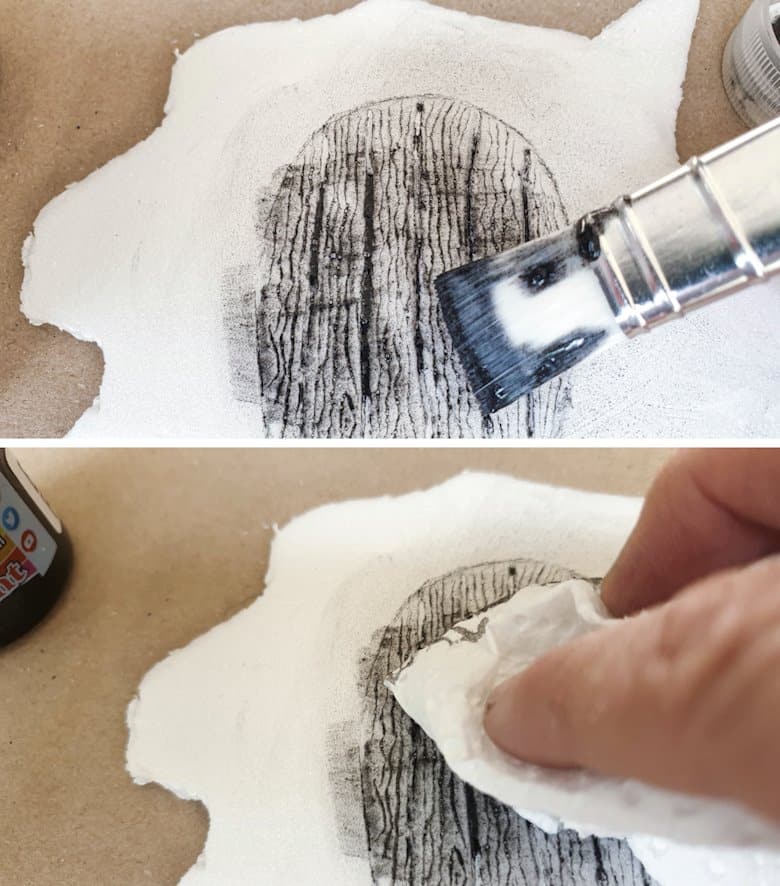
If it looks a little dull, repeat. Wait for the black paint to dry before applying any other colors.

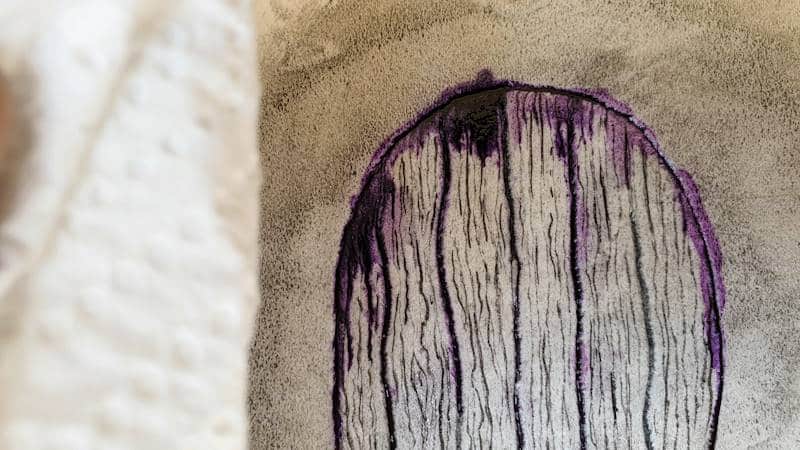
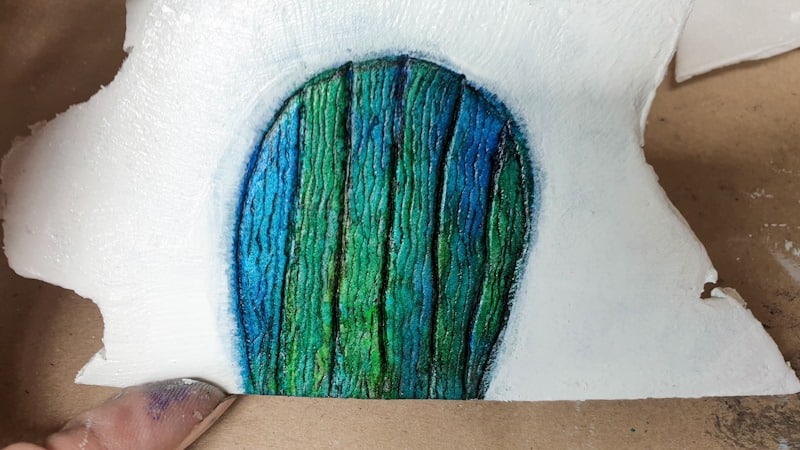
My fairies love vivid colors, so I chose a vibrant blue and green alcohol ink for one side of the door.

On the other side of the door I used pinks and purples. You can use craft paint too. Whichever colors you use, I would suggest you lightly dab them on in layers. That way the paint won’t settle into the grooves and muddy up the black.
To hide the black mess around the door, I used white craft paint. In hindsight, I should’ve used a dark brown, but you live and learn 😀

It’s a good idea to seal the door after painting. I find some craft paints fade over time and a sealer will protect those beautiful colors. Please avoid spray paint sealers. They’ll chew through all your hard work and leave a horrible mess. Any water based sealer should work.
Making a door frame
There are a few different ways to make a frame for the faux wood fairy door. You can:
- cut one out of the polystyrene take away dish,
- paint the frame on,
- make one from ice cream sticks or twigs,
- or use polymer oven baked clay.
I made mine from clay. Flatten the clay out and cut one long strip. Protect your fairy door with wax or parchment paper and form the frame around the door.

Use a pointy tooth pick to draw squiggles or runes and bake the clay according to the manufacturer’s instruction.
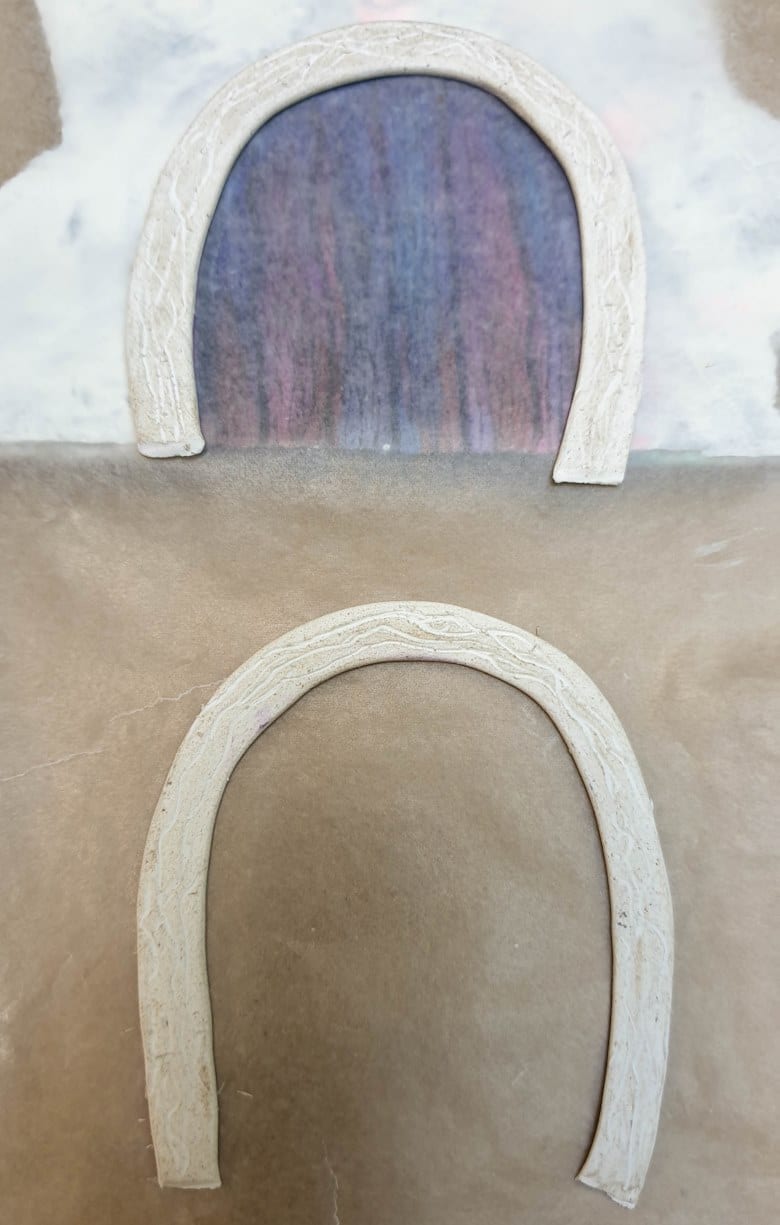
Leave the clay door frame to cool down before painting or staining.

If you’re just making a fairy door, you can glue the frame on and call it a day. Be sure to use polystyrene friendly glue. Any white PVA glue that’s suitable for outdoor use will work. Don’t use a hot glue gun. It will melt the polystyrene. If, like me, you want to add cladding around the fairy door, trace around the frame and put it to one side so it doesn’t get all messy.

Adding stone cladding
Just like the frame, there are a few different options when it comes to making stones for fairy gardens. Egg cartons are a great choice if the fairy garden lives in a protected spot that doesn’t get wet. It’s one of the easiest ways to add stone cladding. My fairy door is going outside in the garden, so a carton is a no-no. Polystyrene on the other hand, is pretty indestructible, and since I still have a big piece of the takeaway dish left over that’s what I used. To give the polystyrene a rough texture I used 100-grit sandpaper to lightly scuff the surface first.

Break the polystyrene into uneven bits and sand the edges into a stone shape.
Glue the stones around the door.
This is the point where I could have kicked myself for painting the area around the door white. Come on, what was I thinking? If you want to make life easier, paint it a dark brown so you don’t have to hand paint between all those polystyrene stones.
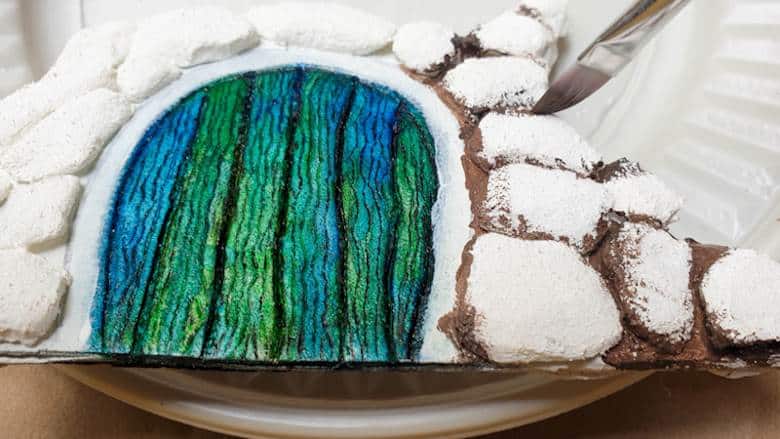
To paint the stone cladding, add dollops of yellows, browns, white and teeny bit of black on a plastic plate and swirl the colors around with a stick. Don’t mix them, just drag the colors around. Dip a dry sponge into the swirls and dab the color on.
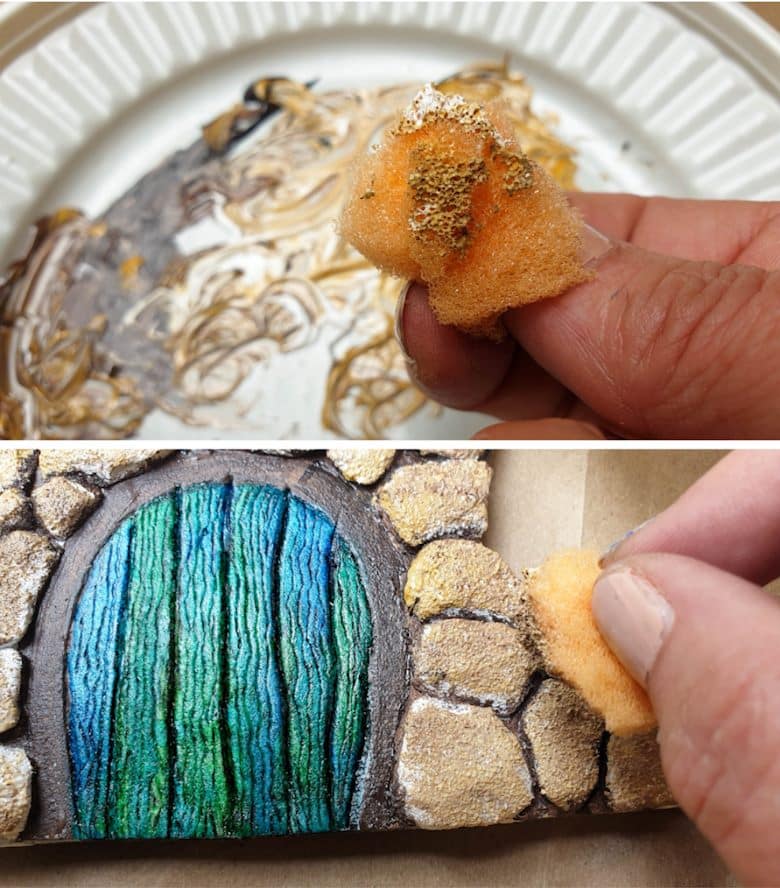
Wait for the paint to dry before gluing the frame in place.

Finishing up
Now we’re finally ready to “install” the door. Slip the fairy garden door and stone cladding into place. If it’s a bit lose, use glue to attach it. Mine fits snuggly under the vine, but there were a few gaps.

Easy enough to fix with some reindeer moss.

Feel free to add other decorative elements like a dainty door knocker or a miniature wreath for that extra touch of enchantment. You can even make a stained-glass window using this tutorial. I kept my door simple and just glued a small bead door handle on.
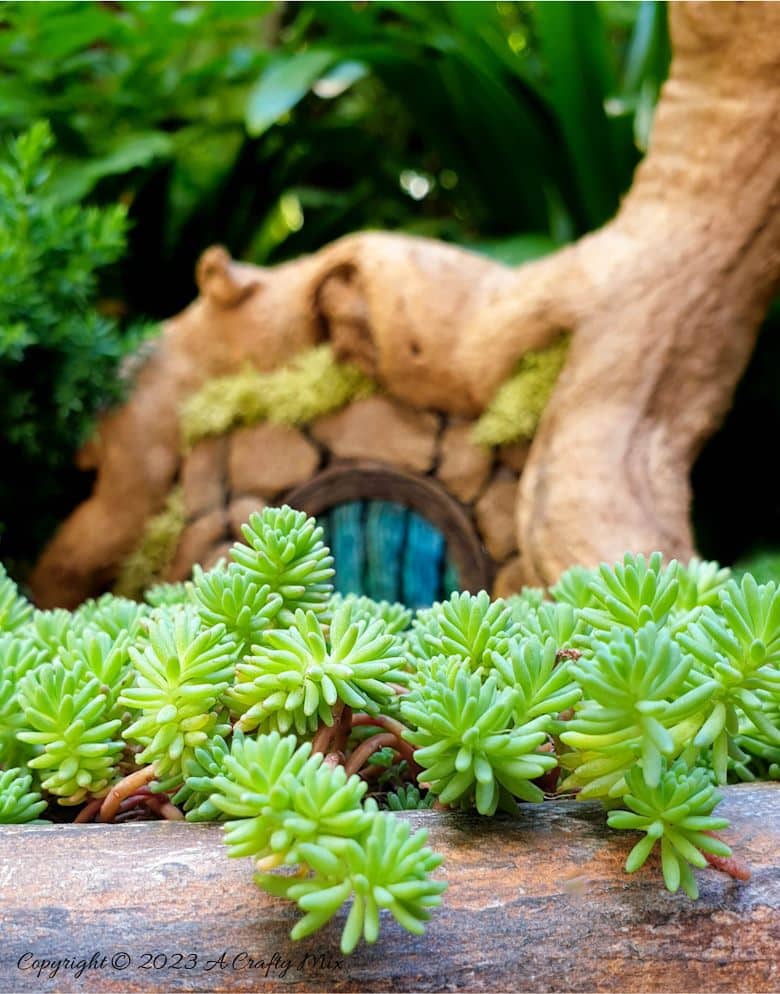
All that’s left to do is find the perfect spot for your upcycled faux wood fairy garden door. I placed mine in a planter, but it would look lovely nestling against the base of a tree or on a gnarly old tree stump . You could even use the door in a book nook or add it to this mushroom fairy planter.
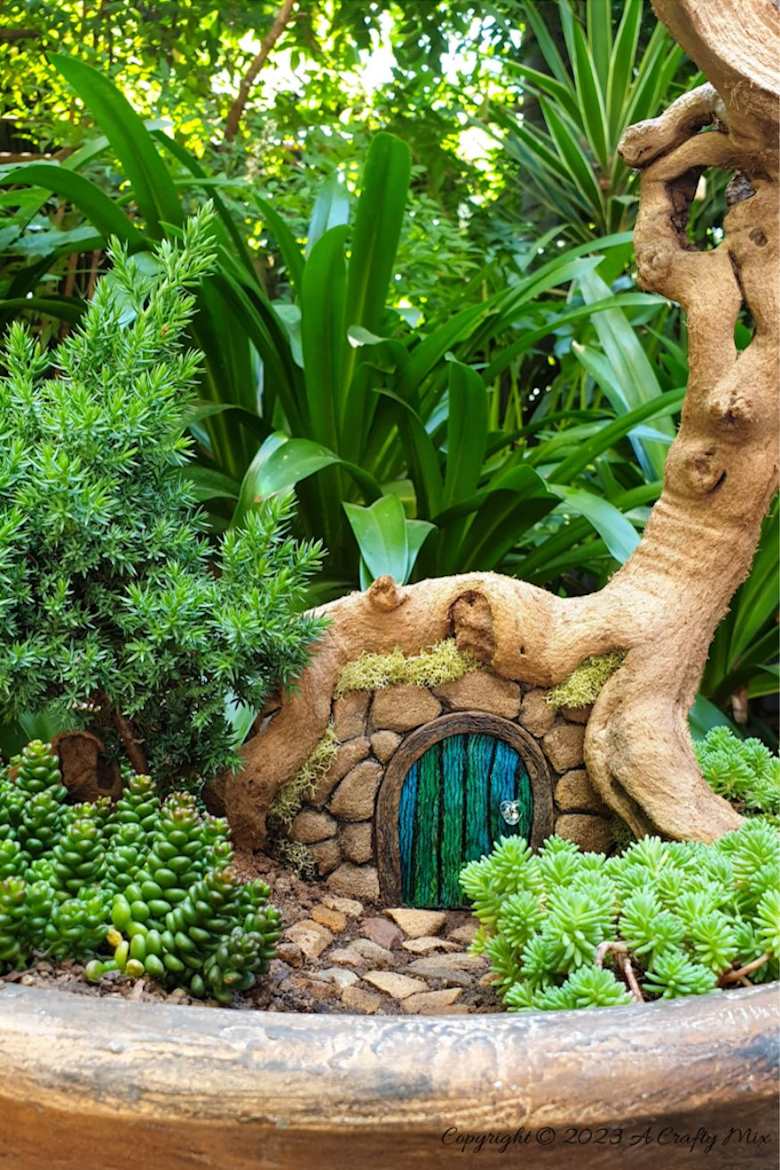
Add a few little rocks or pebbles to make a path and fairy friendly-plants and you’re done.
What plants did I use
I used 3 of my favorite plants to compliment the door. First up we have the Dwarf Japanese Garden Juniper ‘Nana’. She’s evergreen and has teeny prickly, green needles that turn slightly purple in Winter. The Nana grows to about 1/2 meter (1 foot) and will spread over time so she needs to be trimmed to main a tree shape.

The delightful little plant growing at the base of the Nana is commonly known as a Jelly Bean plant (Sedum rubrotinctum). Her chubby leaves turn red when it’s hot and she produces masses of yellow, star-like flowers in Winter.

Another sedum spills over the edge of the planter. This one is a Sedum hispanicum, or Spanish stonecrop for those of us who can’t pronounce big Latin words. Just like the Jelly bean, the color of her leaves change depending on the weather and she bears starry white flowers in Summer.
Interesting fact: the word Sedum is derived from sedare, which mean to appease or tranquillize. I definitely don’t want to tranquillize our fae folk. That would be a bad move, but I’m hoping our new upcycled fairy door soothes them while they work their magic in our highveld garden.
If you like the idea of upcycling a take away dish to make a faux wood fairy garden door, don’t forget to pin it for later.

Sharing caring

Other door upcycle projects
I belong to the International Blogger’s club (IBC) and we challenge each other every month to come up with unique craft ideas that involve a common topic. This month it was all about doors.

- Anita made this amazing Steampunk themed Christmas tree. I’m in love with all those tubes, pipes, and gears. It’s such a clever take on a traditional tree. Can you spot the door?
- Sara from Birdz of a Feather, took upcycling to a whole new level with this medicine cabinet repurpose. I love what she used to decoupage the door.
Oh, and if you’re looking for some of the things we used, we’ve got you covered. Disclosure: Clicking on the links below, means we may receive a commission from Amazon. But don’t worry it won’t come out of your pocket, and it helps us make more amazing crafts to share with you 😉


And if you prefer to buy ready-made doors, then maybe these beauties will appeal.


And as always, wishing you a wonderful, crafty week filled with fairy-tale wonders! Thank you for popping in for a visit.

Last update on 2026-06-03 / Source Amazon Affiliates