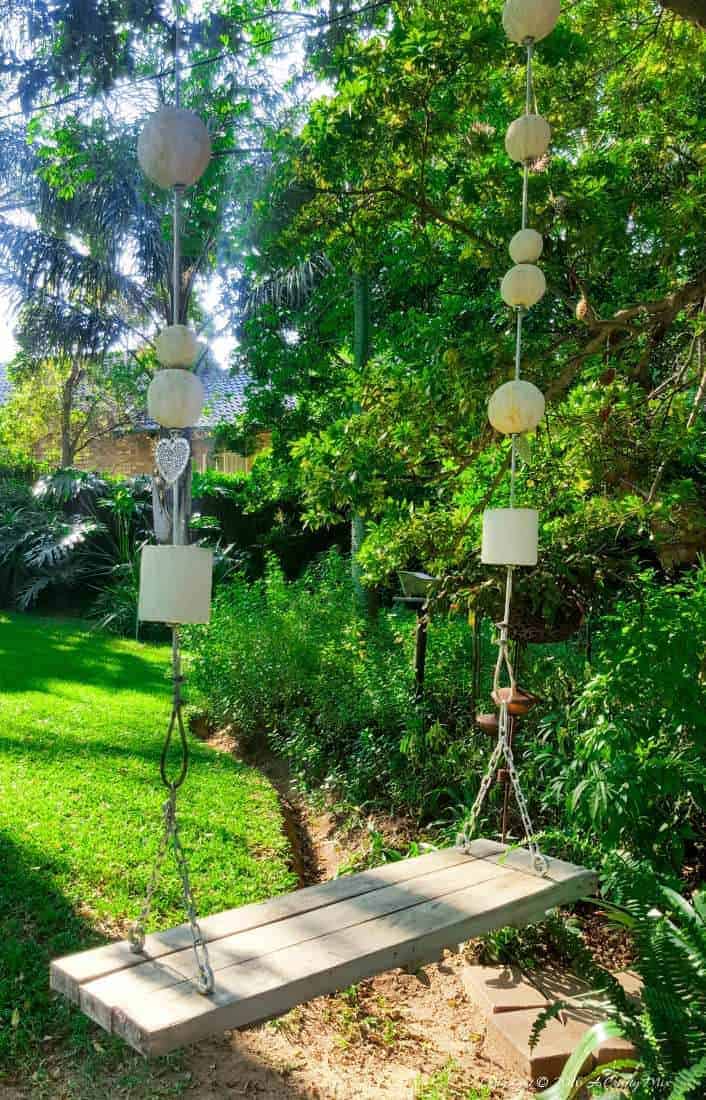
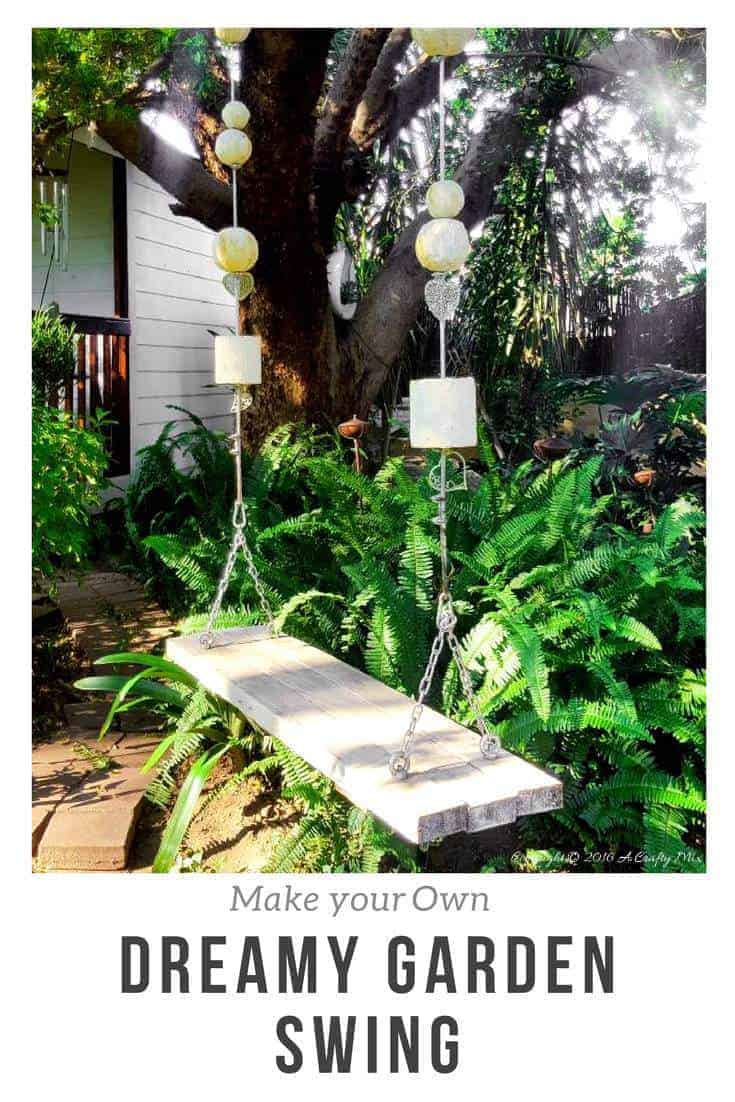
What could be better after a long, hard day at the office than chilling in a lovely, tranquil garden? Especially this time of the year when the weather is so glorious. Our highveld garden must be one of my all-time favorite places to unwind, so when we made a swing for some of our teddy bears a few weeks ago, it got me thinking about making a bigger version. There’s just something about a swing that brings back so many beautiful memories of a time when things seemed so much simpler. When the only thing you had to worry about was how high you could fly.
The world is a playground and life is pushing my swing
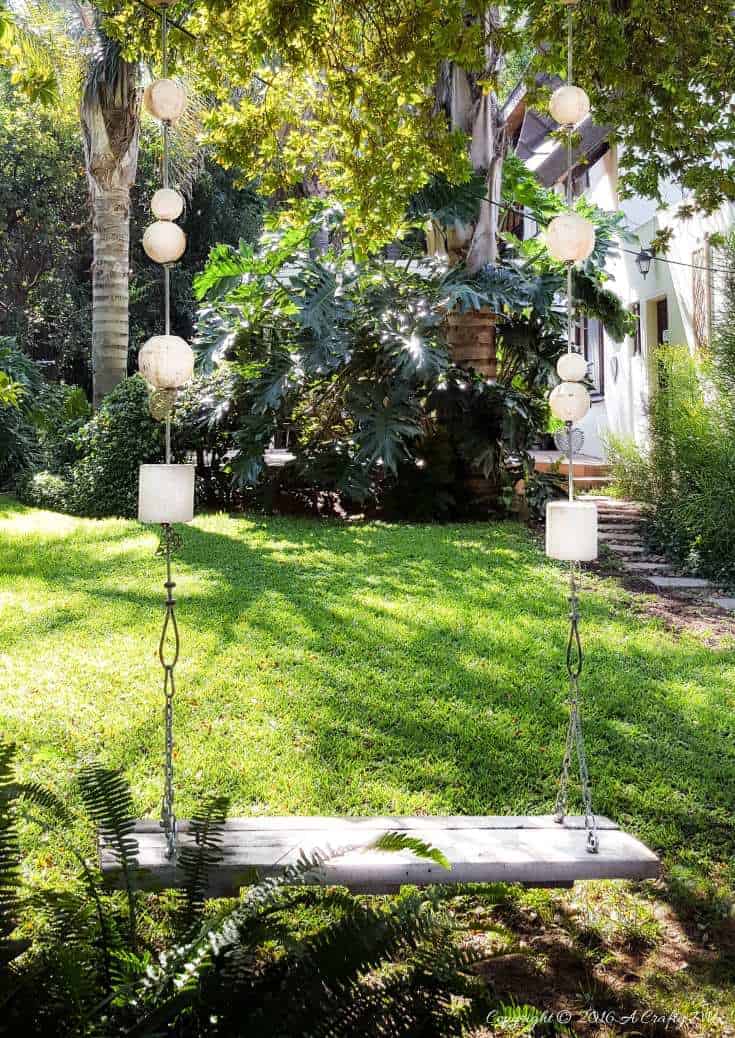
These old bones of ours probably couldn’t handle wild swing rides anymore ;-) But they sure could do with a dreamy garden swing, where we can relax and contemplate the small things in life. So that’s what we did, we built ourselves one.
We’re very fortunate to have a lovely, well-established garden full of indigenous trees, so finding a spot to hang the swing wasn’t a problem. All we had to try figure out was how to make a dreamy garden swing.
How To Make a Dreamy Garden Swing
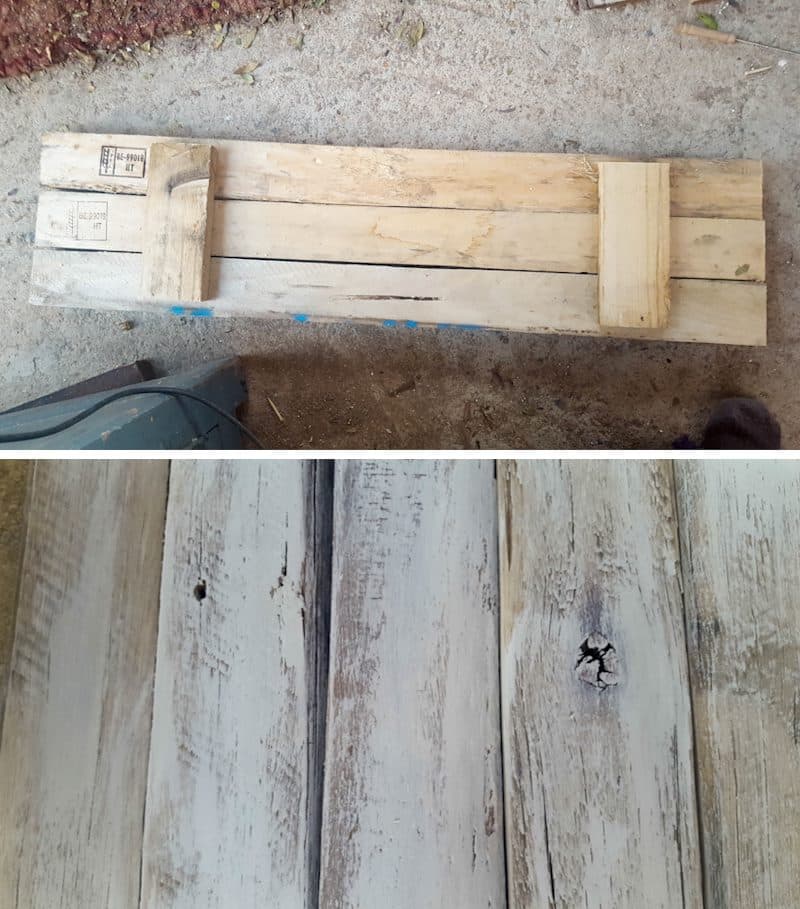
The seat was easy enough. We just took a few pallets and joined them together and then painted them with white roof paint. We figured if the paint lasts on the roof for years, it would be perfect for a swing seat too.

Once we had the seat, we started thinking about how to add the dreamy bits. Please stay with me, coz this is where it gets interesting ;-)
How To Make Large Polystyrene Beads
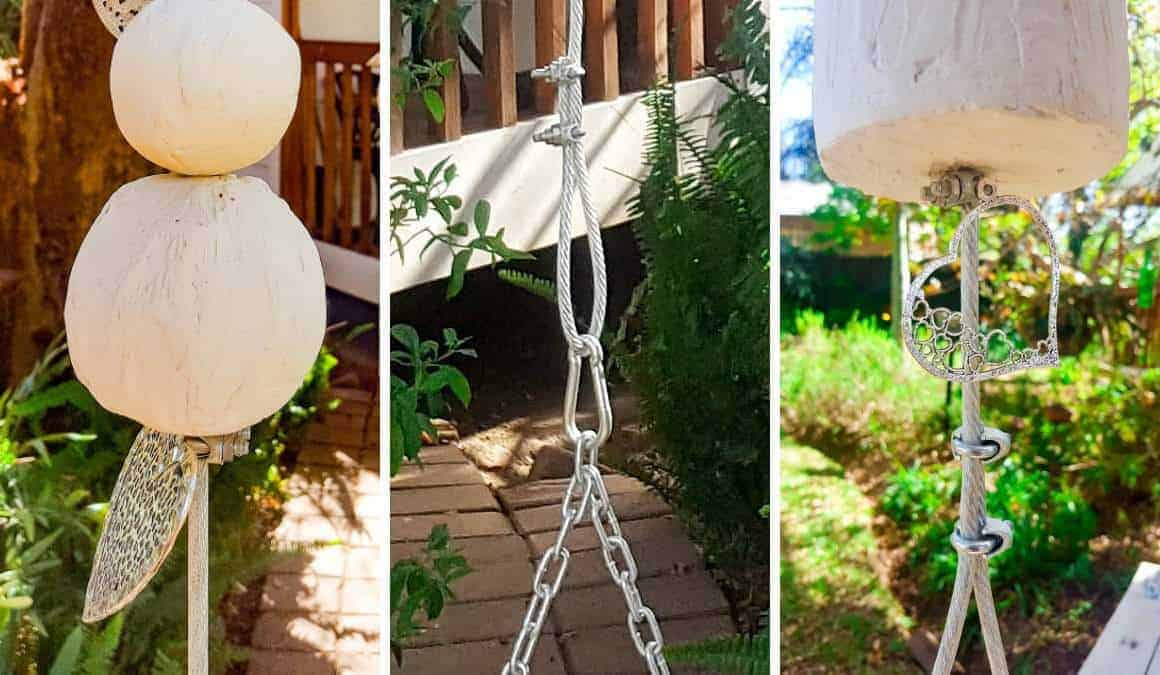
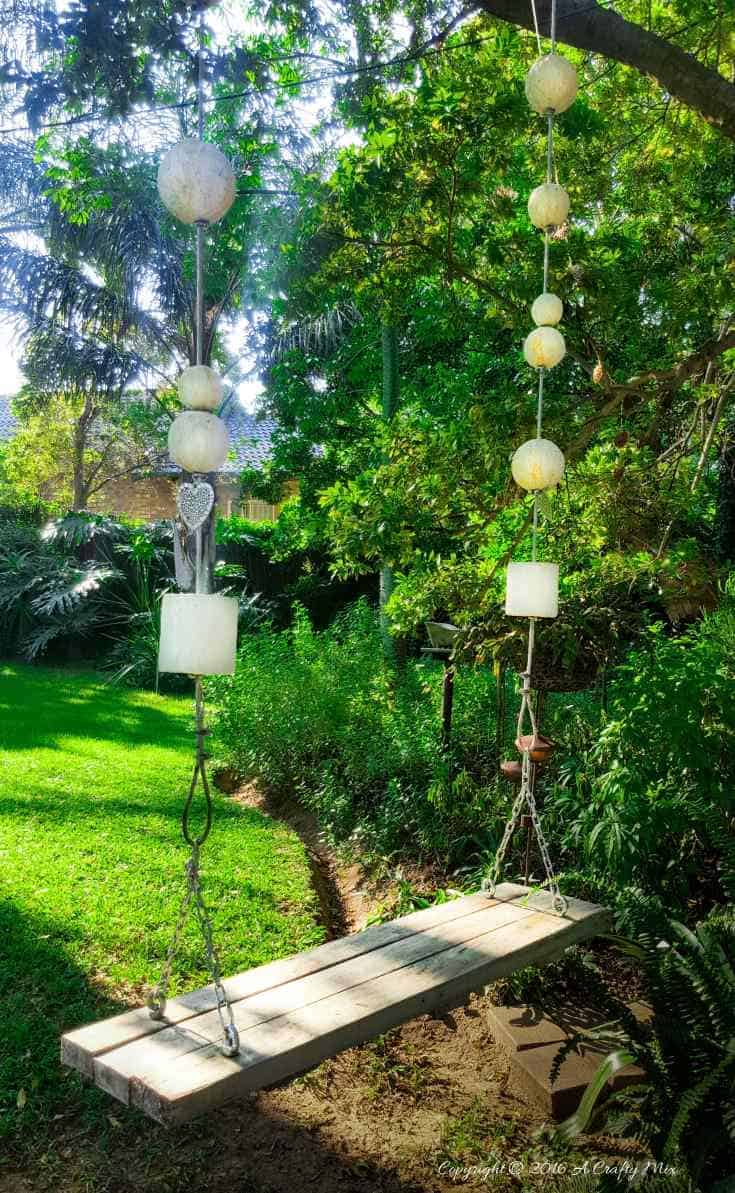
Those beads on the sides are actually polystyrene or Styrofoam shapes that we found at the craft store. They can be used for so many different ways. We made a hole with a skewer stick through the center of each shape and then covered them with some self-adhesive mesh tape to make them stronger and more durable. These babies are going to be hanging outside in all kinds of weather and I want them to last. The mesh also gives the grout, which we’ll be adding in the next step, something to grip onto.
Once all the shapes were covered they were dipped in watered-down waterproof grout and left to dry overnight.
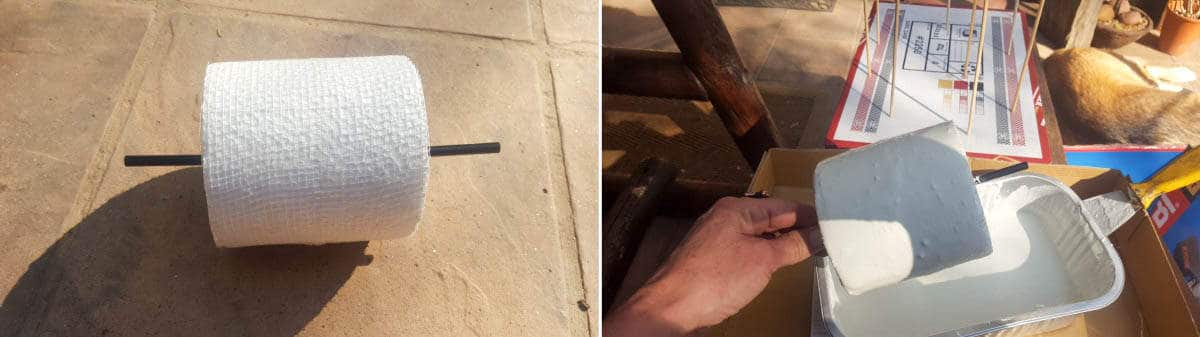
If you insert a skewer or a straw into the shape before dipping it definitely makes things easier ;-)

And that skewer or straw helps keep the shapes upright while they dry too.

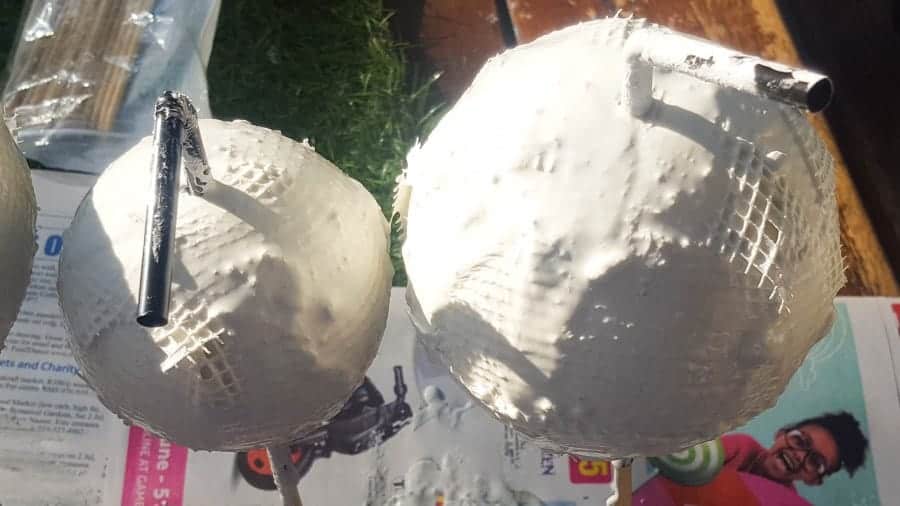
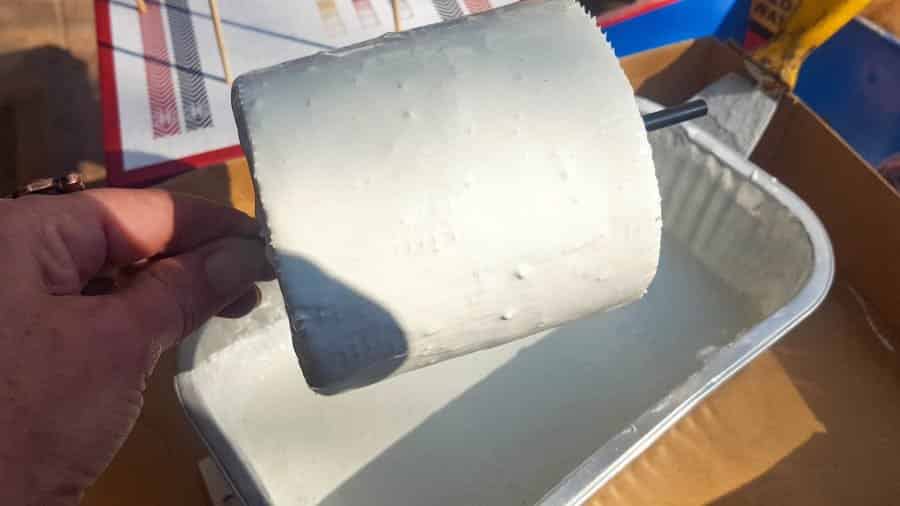
After the first layer of grout has dried, the shapes were sanded and then dipped again until they were completely covered.
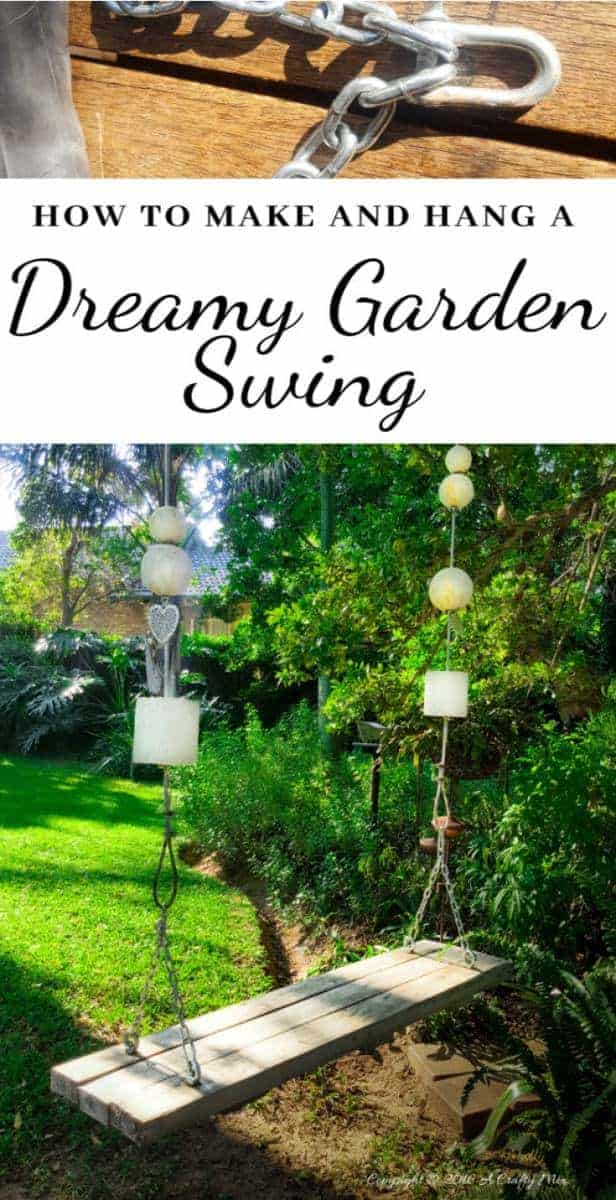
Getting the Dreamy Garden Swing Ready for Hanging
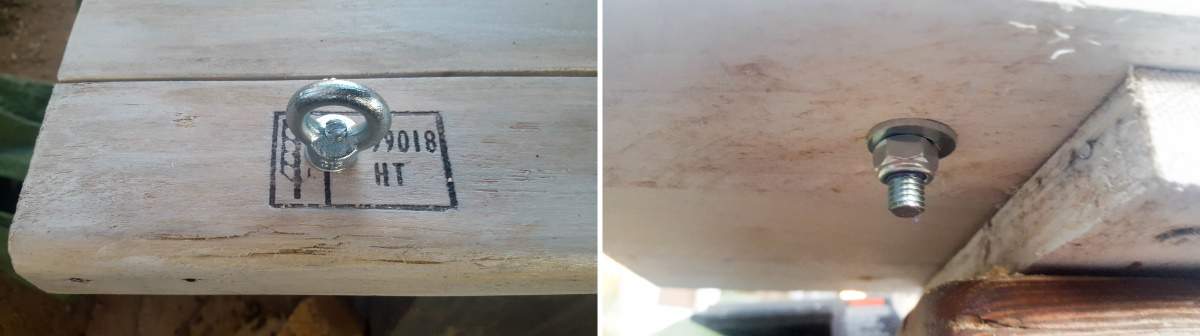
To hang the garden swing we used:
- 4 x Female 8mm eye nuts
- 4 x 8mm self-locking nuts or torque nuts
- 8mm Galvanized thread bar
- 4 x Locking carabiners and 2 x normal carabiners or snap hooks
- Galvanised chain
- A tube inner
- 2 x Galvanized Screw Pin Anchor Shackles (not pictured below)
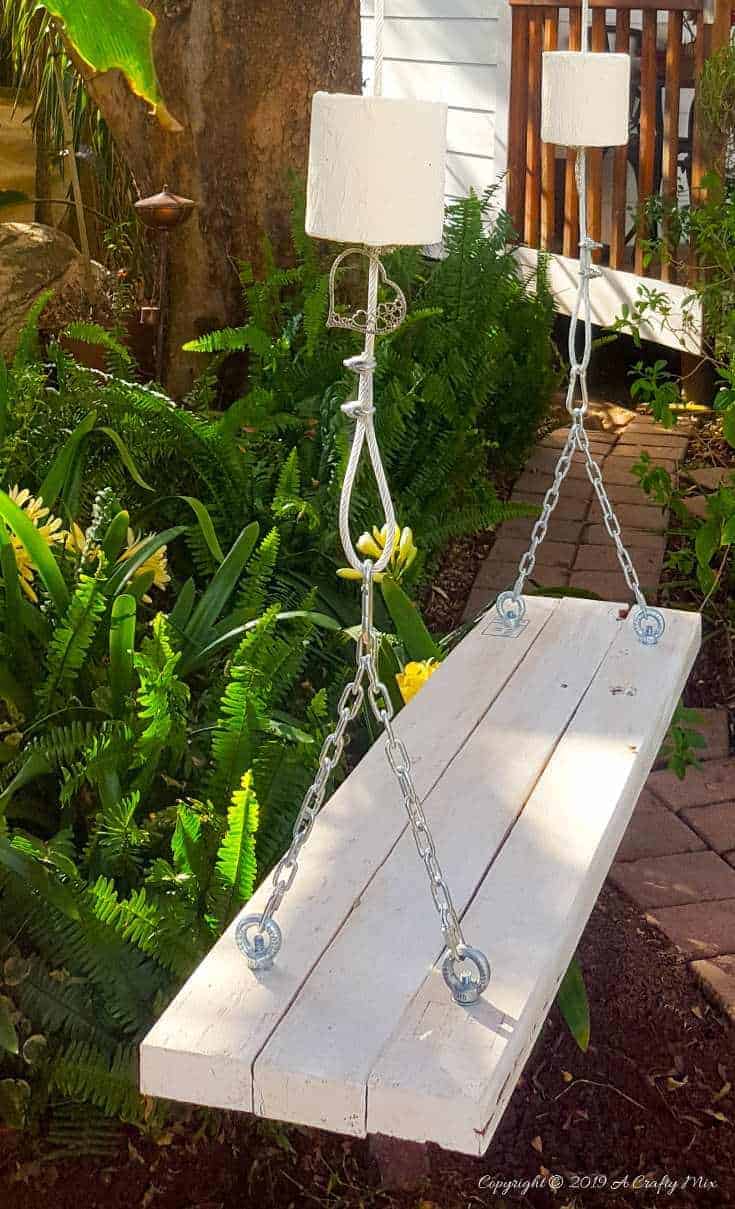
We drilled four 8 mm holes in the pallet swing seat and inserted the female eye nuts from the top. The galvanized thread bar was cut and screwed into the eye nuts from the bottom and then everything was tightened with a torque nut.
The locking carabiners were inserted into each female nut before adding a 70 cm chain on each side. Finally, a normal carabiner was added to the middle point of each chain.
Our trees are really special to us and I didn’t want to damage the branch where the swing would go. After some thought, we decided to use a tube inner around the chains that would go over the branch to protect it.

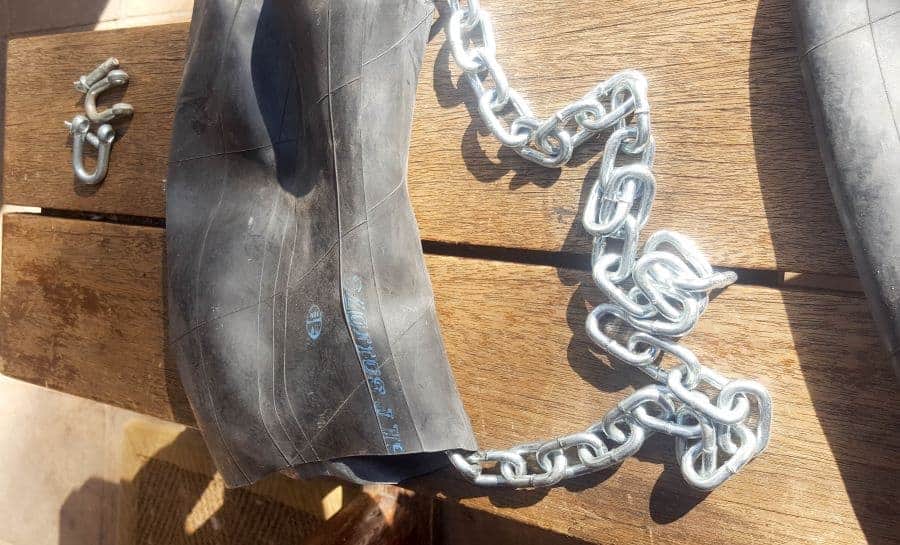
The ends of the chains would be joined together using the anchor shackles after the chains go over the branch.
Attaching the Beads and Hanging Her Up
Once the swing seat and the bit that goes over the branch were ready it was time for us to add the beads to create the dreamy look. We measured the height from the branch down to the ground and cut two pieces of 3.5 mm plastic coated wire. A 4 mm rope clamp was added to the wire and then a polystyrene shape and a bead for love.

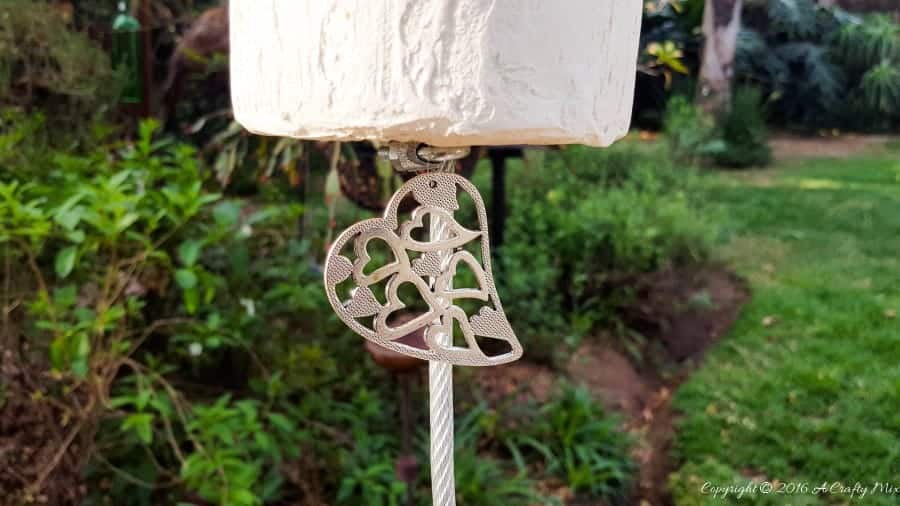
The rope clamps stop the shapes from moving down the wire and they can be re-positioned just by loosening the clamps. We added clamps, shapes, and beads until we were happy with the whole look and then made a loop at the bottom and top of the coated wire and used some more clamps to secure the loop.

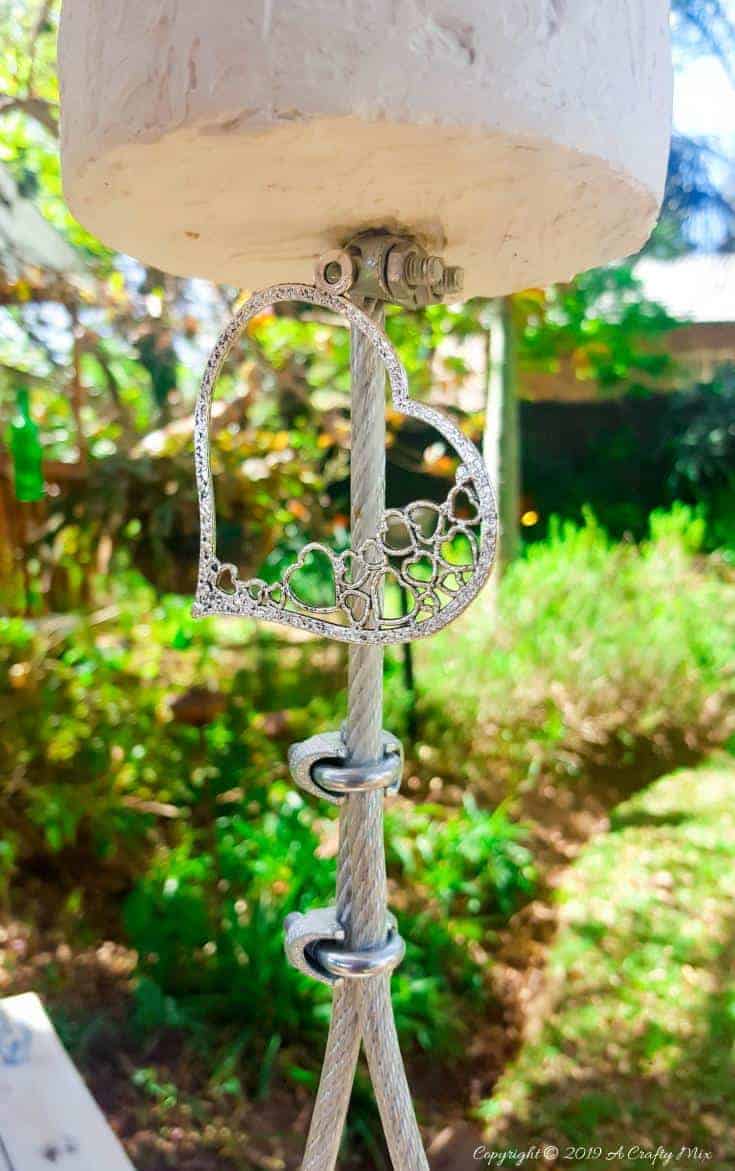
Finally, we used the carabiner to join the looped plastic coated wire to the swing seat. With a little bit of height adjustment, we then connected the whole swing to the chains that we’d thrown over the branches using the anchor shackle.

And our romantic garden swing was done :D
Now we can spend countless hours under the trees in our romantic garden swing, dreaming dreams and just relaxing.

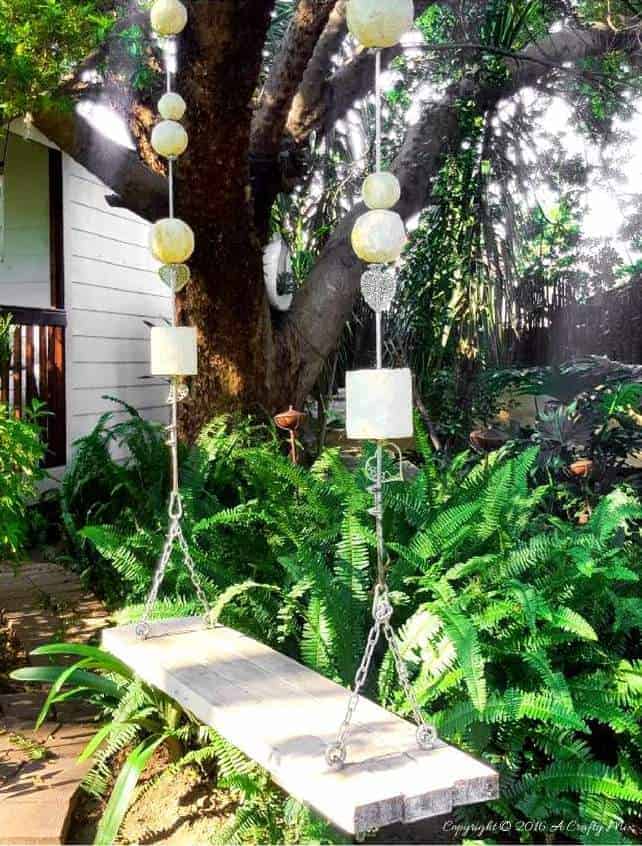
And you’d never say those “beads” are just polystyrene balls :D

I’m hoping it will be easy enough to adjust the swing as the tree grows by lengthening or shortening the chain at the top or bottom. We just need to un-clip the carabiners or the anchor shackles at the top and adjust accordingly. Well, that’s the theory anyway ;-)

If you like the idea of making your own dreamy garden swing don’t forget to pin it for later.

I’d really love to know what you think of our dreamy garden swing. It’s in the perfect spot and hubby really loves it. I swear he’s spent more time on that swing watching me, with a beer in hand, making things than I have. Now my inner child also wants a turn. Wanna join me? We can take turns ;-)

Oh BTW, if you’d like to make something similar or prefer to buy rather than DIY, we’ve got you covered Disclosure: Clicking on the links below, means we may receive a commission from Amazon. But don’t worry it won’t come out of your pocket. It helps us come up with more crafty ideas to share with you
And as always, here’s wishing you a beautiful, crafty and love-filled week. Thank you for popping around for a visit.

50 comments
Michelle, You’ve given me inspiration! I love that about blogs… Anyway, I have just rejuvenated our wooden swing and now I see that those chains need some romantic embellishments! Thanks for the idea.
:) gwingal
You’re most welcome Nikki. I saw your beautiful garden swing just the other day and it’s perfect for adding a few large “beads”
OMG, how come I keep missing these amazing projects of yours, Michelle! I want your posts delivered to my inbox so I don’t miss a thing. LOVE this WANT this PINNED this because one of my old trees is going to get some serious abuse soon by an old gal who refuses to act her age!
LOL Marie, I hope us old gals never act our age. That would be just wrong :D Thanks so much for all the love and the pins
omg how did I miss this post my friend? Can you please just come over and make my yard look like yours and build me a swing while you are at it? I LUV IT!!!!! While you are here you can even drive up to Vancouver and visit your son? Sound like a plan? HUGSSSSSSS Christine from WA….oh and remember Michele if you reply to comments here in your blog the people will not be notified unless they come back and look.
Hey there Christine, I’d be over there in an instant if I could afford the flights. And as luck would have it my son’s in South Africa right now on his Spring break, which is awesome. Best Mother’s day pressie ever. xoxoxoxo
What a beautiful swing. I did a double take when I saw what you created. Stunning!
Thank you so much Elizabeth <3
Michelle, Your garden is a dream…and even more inviting with that awesome swing!! At first glance, I thought you used some sort of fishing bouy to make your swing (Lol)…love it even more that you made your baubles to add charm to your garden swing oasis!! Sounds like you are going to have to make another one!!! ? ❤️
Oooo I never thought about using fishing bouys, those would work to. Thanks for your lovely comment Michelle
This is a beautiful project, you made a nice swing into a lovely whimsical place to dream. I hope that makes sense. Thank you for the inspiration. I am pinning and scheduling. Love it
What a lovely thing to say Leanna, thank you so much
Oh, I can just imagine spending a lazy afternoon on that swing. It’s whimsical and perfect for daydreaming. Beautifully done!
Thank you so much Zenda, I must say I’m still amazed at how much we enjoy the swing. I wonder if we ever out grow our childhoods and all those memories
Well this is not one’s ordinary swing! A magical one if I may say!
Thank you so much for that Maya
I love that not only do you make your own swing, but you make it decorative too!! Well done!
jodie
http://www.jtouchofstyle.com
Thank you Jodie ;-)
Haha! I’ve decided to add your sweety swing as a photo backdrop for my wedding party. HAHA! Thank you so so much for sharing this!
LOL Jennifer, that should be interesting ;-) Congrats on your big day, hope everything runs smoothly and that you have a ball
It IS dreamy! Such a romantic and whimsical swing.
I find the way you DIYed the beads, darn ingenious.
Thank you ;-) I’m glad you like the darn ingenious beaded swing :D
Whoa! This is so cool! I did not expect the way in which you made the beads for your swing. It’s fabulous! I think if I were to make my own dreamy garden swing, I might want wooden beads. :)
I would love to have used wooden beads Gina, that would have made the swing super awesome
Fit for a fairy princess. I want to come swing on it and let it take me back in time.
Oh yes please Kellie, come join me
I need one of these in my backyard. The kids have theirs. Now it’s my turn. The details you added are beautiful, and the swing looks like the perfect place to relax.
Thank you so much Tara, I’m so happy how it turned out and it really is relaxing
Yes,I want to join you and take my turn, You guys did a great job, for me it is very difficult to do. You have a nice garden and this huge tree is nice for the swing, this your dreamy garden swing is so attractive because you decorated it with beads. I know you are enjoying the best weather in South Africa, here it is still cold, spring is here but not feeling it.
Ahhh Sadhna, you really need to come back to South Africa for a visit and to soak up all that gorgeous sunshine again. We can have a picnic under the trees and savor all your delicious recipes together
This is so beautiful! It looks like a wonderful place to sit and relax!
Thanks so much Jess, we’re really enjoying our new garden swing
I’m coming over RIGHT NOW to sit in that swing! Lovely! And your garden looks lovely too…a wonderful place to sit & contemplate. I love gardening too. Your swing brings back wonderful memories of a wide swing my dad built for us. We used to swing then launch ourselves out of it at just the right moment to land in a pile of leaves. So much fun then…ha…can’t imagine myself doing that now. All the neighborhood kids came up to play too.
Oh that sounds like so much fun Florence. I think I might just try that when Autumn decides to pop around again. Although I’ll probably hide a huge puffy cushion under the leaves, coz these old bones might not handle the landing to well ;-)
That swing really does look dreamy – I love how creative you were with the idea for the beads! I’m a huge fan of thinking outside the box for things like this!
Thanks so much Lisa, I wasn’t sure if the beads would work, but we really wanted something a little different and they seem to be holding up nicely
Michelle I’d love to join you and get away from all the cares of the world. Your garden is really a dream getaway a refuge that can ease a tired soul. Beautifully done as always and I especially love those whimsical hearts you added at the end.
Wouldn’t that be lovely Mary, maybe one day <3
Gorgeous – love the beads. Can’t wait for the kids to move out so I can have things like this for myself!
LOL Sarah, you’re right, us grown ups also need a turn sometimes
Oh how cute Michelle, You are always coming up with some ingenious idea! I haven’t sat in a swing in years. This would be so fun to have one in the garden. I have the perfect tree too except it’s close to a rock wall, and the hubby has been wanting to cut it down. So far I have saved it.
I’m glad you saved the tree Linda and maybe you can still get to build a grown up swing on day.
That is incredible and dreamy indeed! Our nieces and nephews would love it if we did this!
Thanks so much Angie. I’m sure you and your hubby will be able to make something even more special
Oh.My.God! I don’t have a proper place for such a cutie, but I do have to make one! I’ll have one in my backyard even if I’ll do it for fairies…
Oh yes, the fairies would love it too Gabi
Your garden is stunning, wow, so tropical and green, I love it! This dreamy swing fits in perfectly and I’d love to sit there for a chat with ya! As usual, you created something so unique and pretty Michelle, what a lovely swing!
Thank you so much Katrin. Yeah we’re really very lucky with our garden. She has a mind of her own and flourishes without to much intervention from our side. It took a lot of hard work, but the broken nails and sore muscles are worth it in the long run. It would be lovely to have a chat there my friend. Maybe one day ;-)
Michelle, I’m coming over for a turn. :) I think the swing and all the baubles you added are wonderful! The way you made the pieces concrete is really cool. What a great idea to make a swing for us big kids.
Yay, I’m sooooo glad to hear that. I’ll see you at the swing in a few minutes ;-)